
the pushback
As previously discussed, mr. monster fridge has been sticking out two feet for the last month or so because I didn't want to push it back in place 'til we were sure the water line behind it was leak-free- mainly because pulling a flush-to-the-cabs 500 lb chunk of metal out ain't easy. After a forever-ish wait for my super-overkill reverse osmosis system to arrive from Amazon (actually BofA's fault for arbitrarily changing my Amex card #, thereby causing order cancellation, and it was considerably pricier the second time... grrrr), it landed two days ago and I had Larry the plumber install it yesterday. Sure enough, the turkeys who moved my fridge and installed the brass water line behind did it totally incorrectly causing a leak back there (fortunately of the minor variety), so it was another visit from the plumber today and another $85 to straighten it out (explantion: when they installed all the island plumbing, the plumbers included an extra line under the concrete going from the island to the rear of the fridge for reverse osmosis water to the fridge, but it wasn't connected until now).
Now leak free, all I had to do was push it back (very heavy), raise all the feet so it would properly sit beneath the "tip protection" 2x4 on the wall (before you ask, there are long horizontal bolts that you turn from the front/bottom to adjust the back height) and generally make it vertically even with the cabinets. Also had to plug it into my special high-up outlet because up 'til this point I've been using a beefy extension cord. Remember this mess? The idea is that you push it back then raise all four legs until it gently touches the bottom of that very stoutly mounted 2x4 sticking off the wall. And you plug into that very high-up outlet because in theory there isn't enough room between the back of the fridge and the wall once it's pushed in. I also found that I had to remove the wood trim piece above it to plug it in, which is semi-tricky given how I mounted it (admittedly this would've been easier if I had a real ladder). 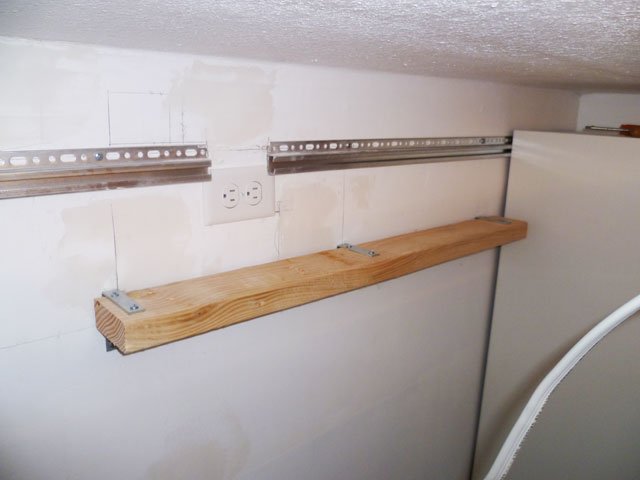
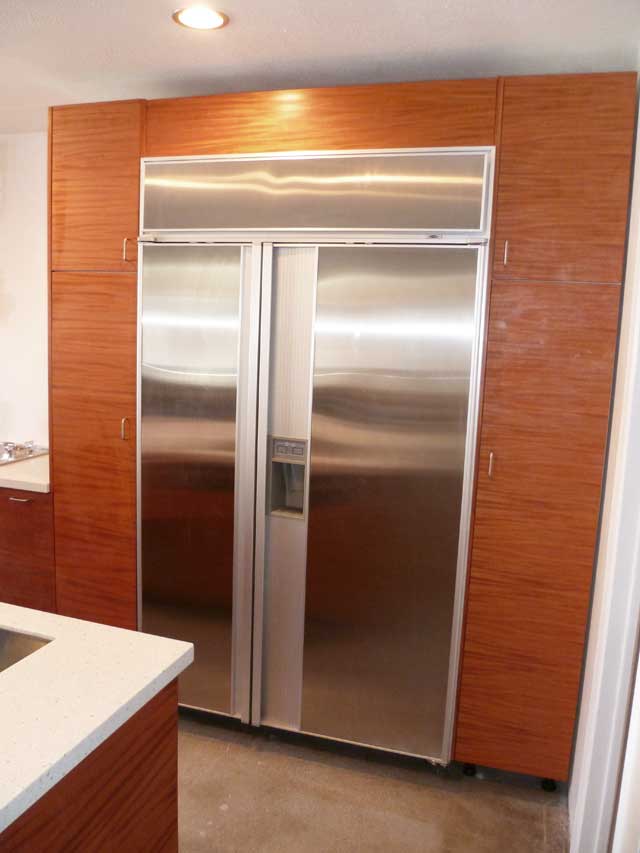
Unlike a regular fridge that has clearance on the sides and sticks out in front, a built-in like this has an aluminum lip around the sides and top that fits directly against the front edges of the cabs, so you can imagine the amount of super-tight measurement and planning that went into the cabinetry and trim pieces. It took a fairly large amount of tweaking the height and wrestling the bastard back and forth to get it all in place, but I'm happy to report (thank god) it all lined up as planned.
While I was at it, I attached the handles for the upper and lower cabs on the right- I skipped them before because it was too much of a pain to get between the sticking-out fridge and the wall on the right. Finally, for all the naysayers, the refrigerator doors open properly and clear the island with plenty of room to spare (ok, actually just Myke and my mom- believe me there were far hairier/more critical measurement planning conundrums than this).
BTW, thanks Kim for the stainless steel polish that made mr. Sub-Zero shiny and happy for this shot (even though it smells a little like Raid).
 celebutante
Addendum... after letting it get up to speed (freeze?) all day, the icemaker works like gangbusters. This is a relief because I was told Sub-zero fridges sometimes need some sort of pump for the water going into the icemaker for them to work, not to mention this is a 15-year-old-ish fridge, so I'm lucky everything works as it should. Super reverse-osmosed icewater through ye door is swell indeed (and has a nifty blue glow when you use it).
Reader Comments