SEARCH
Mid-Century Malaise – "SHOW ME PICS" Version

Sunday
Sep032017

Nighttime Outdoor Desert Wonderland

Here's the nighttime outside view of my place. I wanted to have lots of colored lights, but I literally knew nothing about landscape lighting. It quickly became clear that 12-volt lighting is most common, and like practically every other type of lighting these days, LED was the way to go - less power consumption, almost-infinite bulb life, etc. The house already had landscape lighting in place when I moved in, but this consisted of a smattering of bent, broken, or knocked-down 12V halogen fixtures. The one super good thing was that they had run wiring from garage area to the "island," and under the drive again to the left side of the house. These wires still worked fine, saving me the nightmare/$$$ of running low-voltage wiring under the driveway. Thanks, original homeowners. 

That said, I made a world-class zinger mistake by not running the rest of wiring when we had the landscape re-done in 2015. Probably hard to tell in these pics, but the buik of the landcover is pea gravel, aka, really small stones. Burying the somewhat thick 12V wire beneath that stuff is a futile effort because it always wants to pop out (I finally figured out that you can hold it down with garden staples, which are sort of like U-shaped little coat hangers). 

The installation you're looking at in these photos is somewhere around 20 lights total, installed over three separate projects. As one does, I got a lot better at it as I went (and eventually figured out that shoving the wiring under the weed prevention cloth, although tedious, is by far the best way to keep the wires concealed). Some more exciting details:

Colored Lights: I was a little surprised to learn that nobody makes colored landscape lights. I was hellbent on making my place look like Disneyland at night; I figured if I could disassemble the lights, I could probably insert colored gels inside (incidentally, the cool operating temperature was one of the reasons chose LED's - halogen bulbs would probably melt the gels in short order). I found that some landscape lights come apart, and some don't. The majority of my lights are these little Moonrays 1-watt guys chosen because 1) it's easy to put gels in them, and 2) they're affordable - they come in two-packs and end up being about $11 each. Also, they're black, so they don't violate my "no brown/tan/gold/bronze" rule. I used them for the small "ground level" plants, sometimes paired in V configuration. For the bigger stuff like the palm trees and the turquoise washes between the Italian Cypress trees, I used these Malibu 20-watt equivalent lights. Unfortunately, sometime last year Home Depot decided not to carry Malibu brand lighting anymore thereby putting the entire company out of business (not making this up, check it out). The landscape lights currently available at both Lowe's and Home Depot do not come apart, so I can't buy lights there any more. Bummer. Meanwhile, I got the gels from Amazon for cheap. Cutting them is super easy, you just tell your girlfriend to do it (she likes a crafts project). Seriously though, you can use the glass lens as a cutting template, so it's pretty easy. I've noticed that some (not all) of the gels discolor after a while, but they're super easy to replace, and I have enough gel sheets to last forever.

More Fun With Wiring: The previous owners left the power pack/timer box, but it was situated in the outside beds where the Italian Cypresses are (dummies), so we relocated it into the garage. The 12V wire itself is pretty burly stuff, and you're supposed to use "connector plates" that screw together and wedge the wires, but they're big and bulky, and my electronic-y background tells me that squishing wires together is a very bad plan. The other approach is to just twist the wires together and use big outdoor wire caps that are full of silcon goo intended to keep moisture from corroding the connections. This is all good in theory, but sometimes you need to twist four wires together, and thick, mult-stranded wire doesn't like to stay together. And when you go to fix the inevitable detached wires, they're all covered in silicon goo. There had to be a better way... after a little research (and a suggested trip to the NASA website on how they wire stuff), here's what I came up with: twist wires together, then wrap with really thin 24 AWG uninsulated wire. (Sorry the front connection is out of focus.) There's a fancy wire-wrap tool one can get, but my little fingers are fine for this job.

Solder the whole mess:


Shove aforementioned goo-filled wire cap on:

Shove under rocks/weed prevention cloth and ponder how it's never coming apart. The only negative was dragging out my fancy two-piece Hakko soldering iron along with appropriate extension cord, but I finally gave in and bought a wee little Weller butane-powered soldering iron... bye bye extension cord. If outdoor soldering (or car stereo installation) is gonna be a thing for you, this is beyond super nifty. 

Looking ahead, I intend to do path lights on one side of the house (I already bought a guinea pig light to see if I can shove color gels into it) as well as a bunch more colored lights in the back yard. Meanwhile, here's a bunch more pics of the front of the house:


Sunday
Apr242016

Time for my annual blog entry. 

To begin with, I really owe y'all "part two" of the previous "Super Duper Mega Outside Renovation," because it's pretty much done. The good news is you'll get to see lots of the stuff we planted in fanciful, grown-up prettiness (some of it died from last summer's insane heat, but we've successfully replaced most of it). The bad news is that I don't have good "after" pics (it's dark out, and I gotta clean some stuff up!), so this entry won't be about that. However, I've done some fun indoor renovation stuff since, so let's check that out...
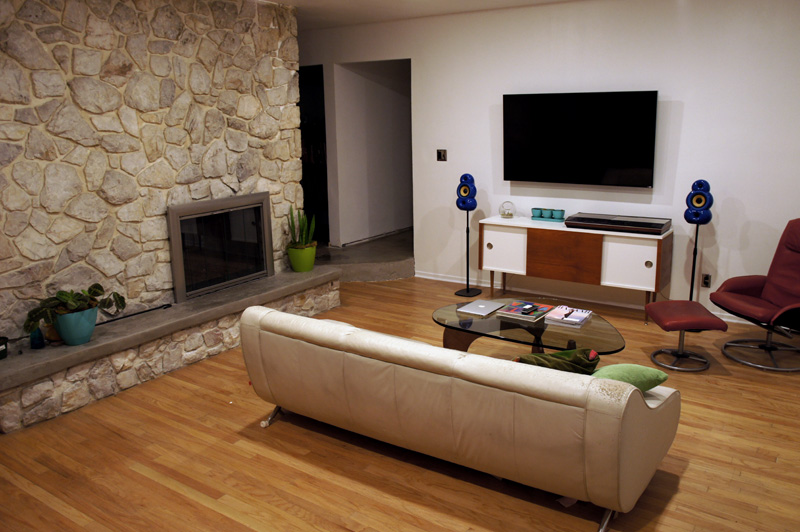
The Family Room
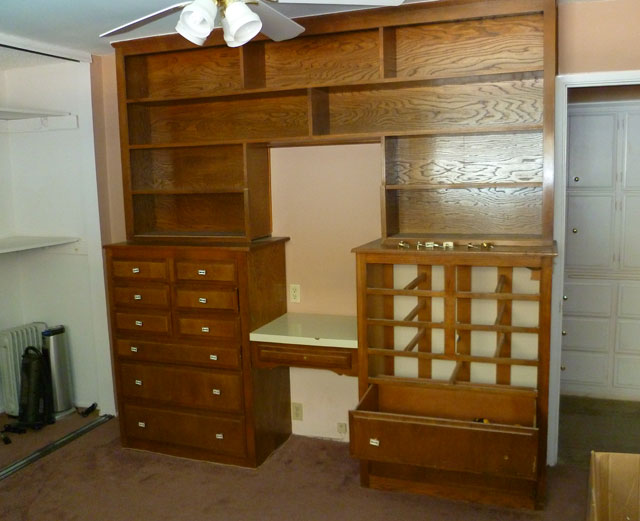
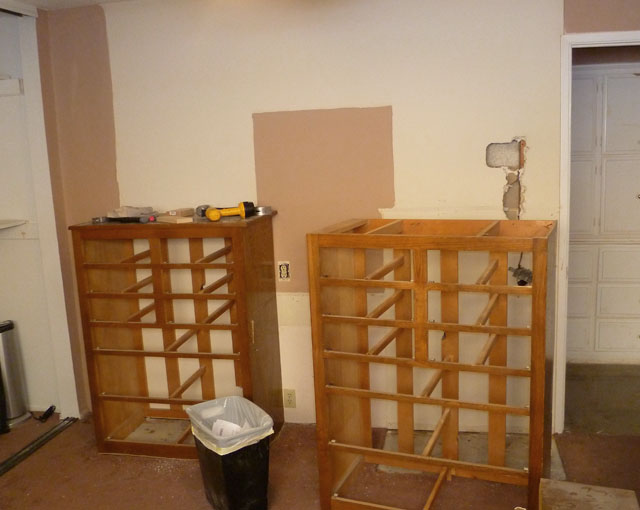
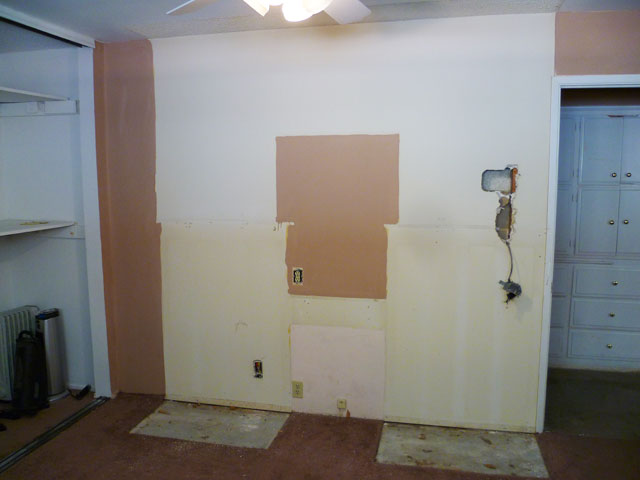
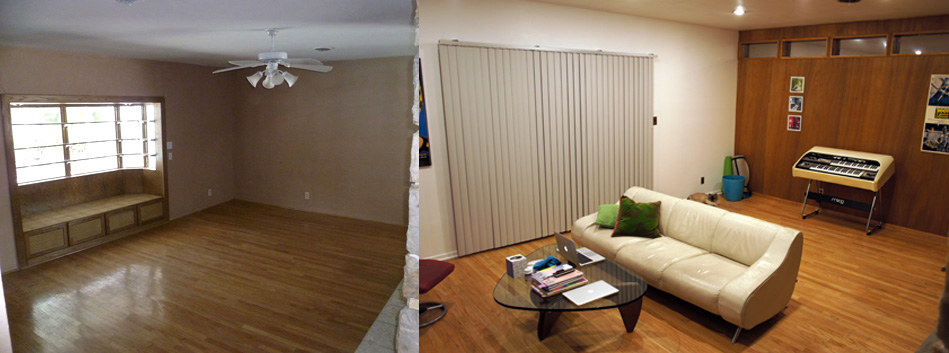
Aka, the back room that's been a dumping ground for most of the time I've lived here, aka, the room where Kim used to sleep in before we got really friendly. Here are a couple of HGTV-worthy before/after shots. Most of the before shots were taken four years ago, before I moved in.

Starting from the bottom...

• The wood flooring is original (and it's real wood), pretty much the only floor in the entire house that I've kept. After four years of dragging around toolboxes and mattresses, it was looking a little tired, so I had it mildly reconditioned; basically they lightly sanded and re-coated it. Was kind of expensive considering the short amount of time it took, but it did improve the appearance.

• I painted the walls white. Again, I actually did this a few years ago when I was painting the kitchen/living room.

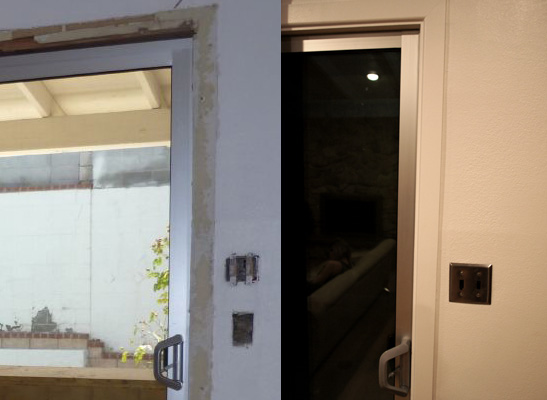
• The wood 'n' wicker bay window delight has been replaced by an eight–foot aluminum/double–pane glass slider. That actually happened a long time ago. However, the sliding glass door installation left a hacked-up drywall mess around the perimeter, and I kind of had no idea how to fix it. Fortunately, a guy who did a lot of work on my folks' house was a master of this kind of detail work, and did a fabuloso job of cleaning all that up (and did the same for the other sliding glass door I had replaced on the side of the house). Beforzo 'n' afterzo:

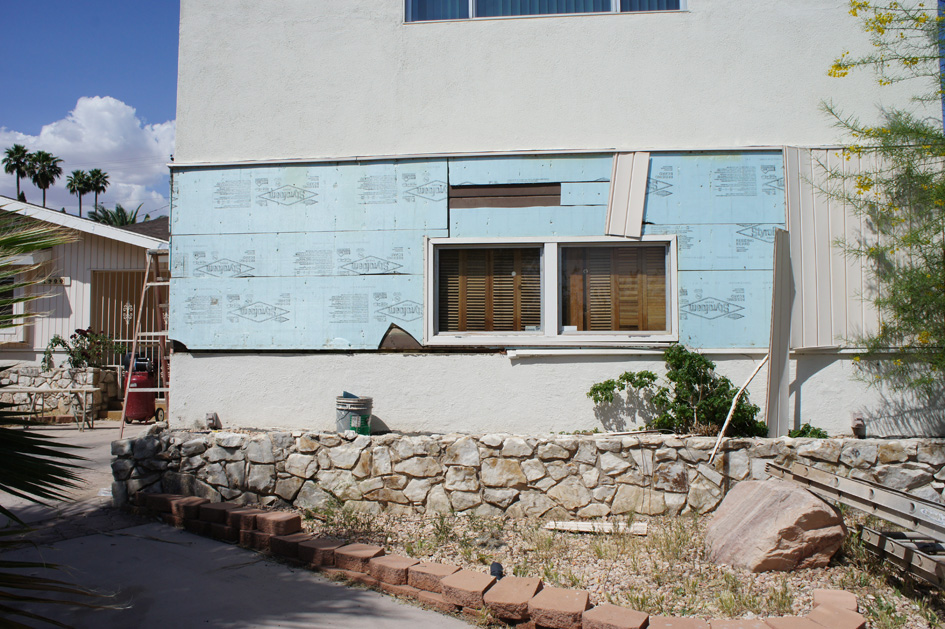
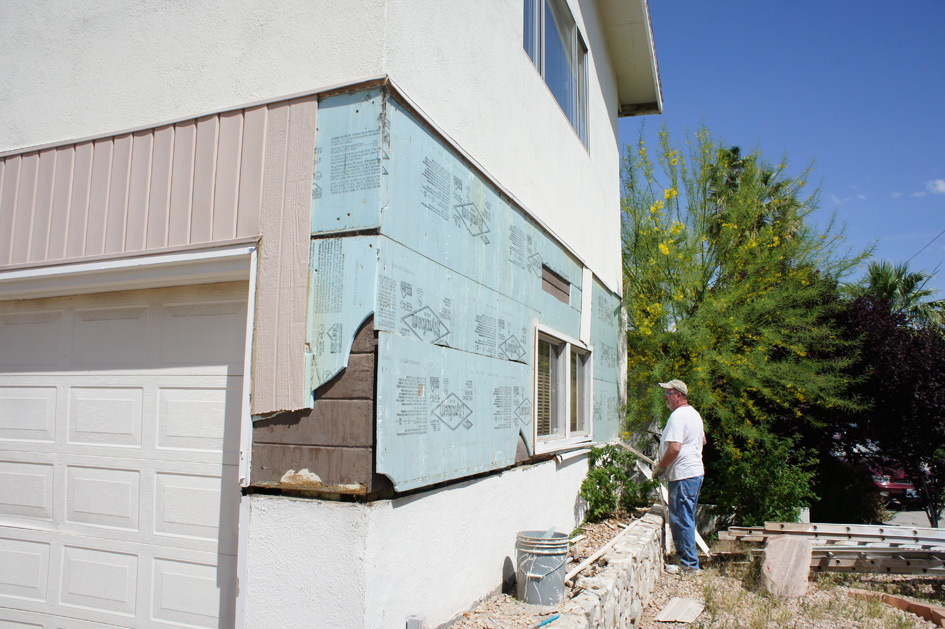
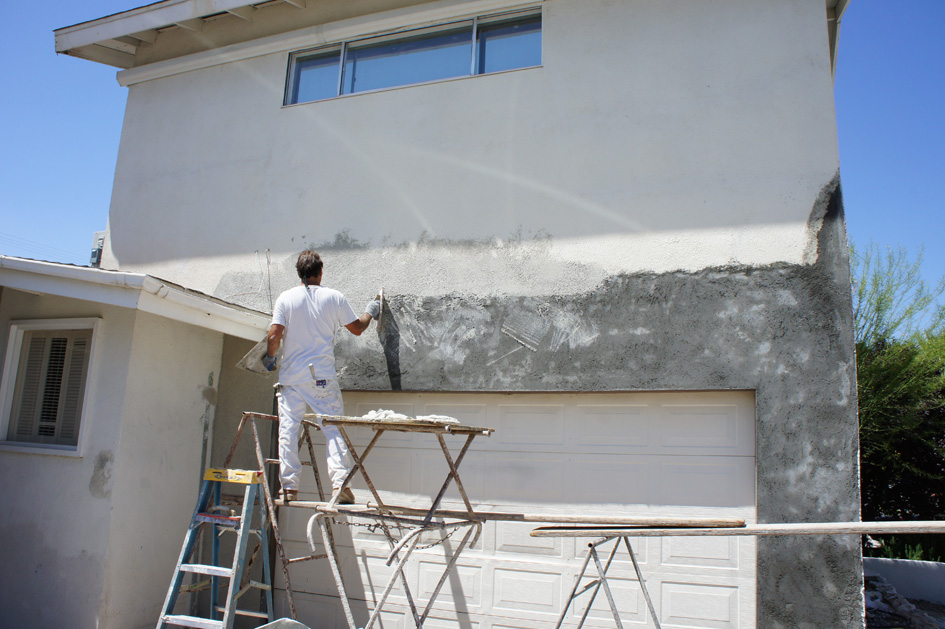
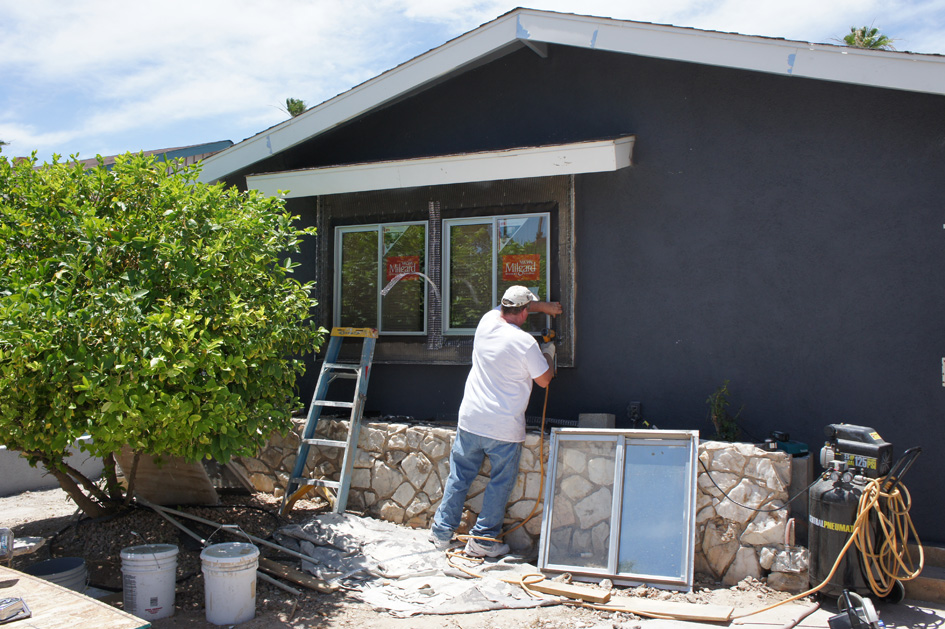
• Back wall now has windows and wood paneling... me and my genius "easy" ideas. Besides that bay window mess, my other big beef with the room was that that it was pretty dark. The big sliding glass window helped a great deal but there's a sun screen that runs the length of the patio, so the room still could've used more light. I'm a huge fan of clerestory windows (that's fancy terminology for the high, skinny windows that were all the rage in Palm Springs-style architecture). This idea rattled around my head for easily over a year, and handyman Keith and I finally sat down and made plans. I knew they wouldn't need to open; orginally my thought was to put a window between every stud, but once we did the math to account for the window frames (which we made from 3/4" solid maple) and the width of the studs themselves, it became apparent that we'd have a bunch of windows roughly 12" wide by 9" high. Not only was that a lot more square than I envisioned, but we would've had something like 10 or 11 of them. Since this wall wasn't supporting all the roof trusses, Keith suggested we cut every other stud and make the windows twice as wide, which looked nicer and meant we only had to make five of them. We went with wood frames because I knew this would greatly simplify mounting and I liked how this would create a little "shelf" for each window. (I still need to stock up on Swarovski crystals to hang up there...)

The frames are about six inches deep, so they stick out of the wall a wee bit inside and out (stained and polyurethaned for weather protection). I had the clever idea to simply cut slots in them, then we just dropped in the glass and silicone caulked them. Said cleverness was offset when I ordered the glass and didn't properly measure to account for the slots, resulting in roughly $50 worth of useless, too–small pieces of glass.

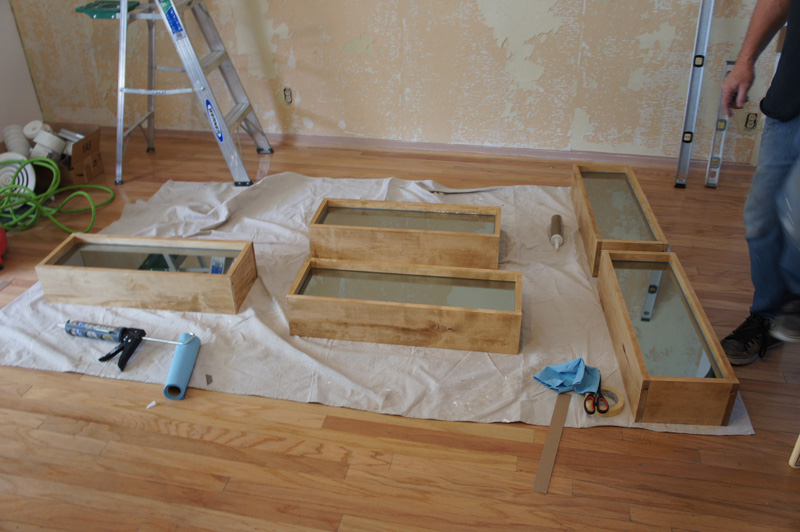
Adding to the fun, the stud spacing varied slightly, so each frame (and piece of glass) was a slightly different size. I also applied Gila UV heat control tint to the glass before Keith assembled the frames. BTW, firing a pneumatic nail gun through very stiff maple in close proximity to glass really puts hair on your chest (I guess it's better than using a hammer).

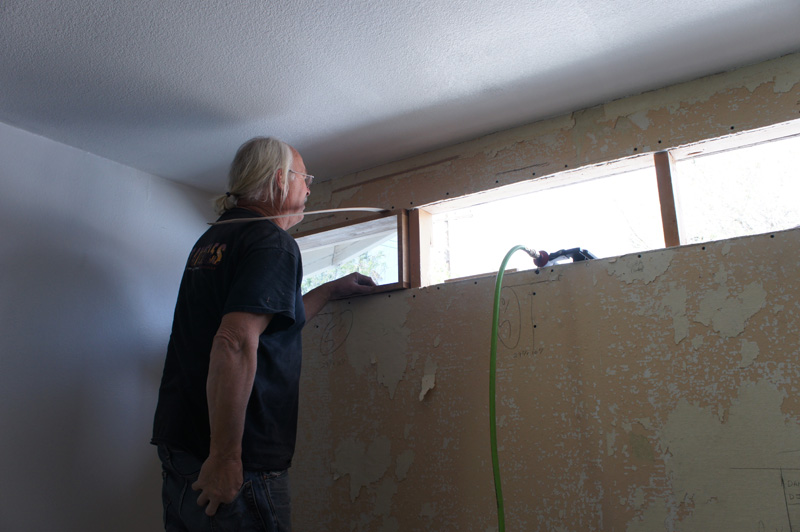
Keith putting in frame number one. Kathwakata!

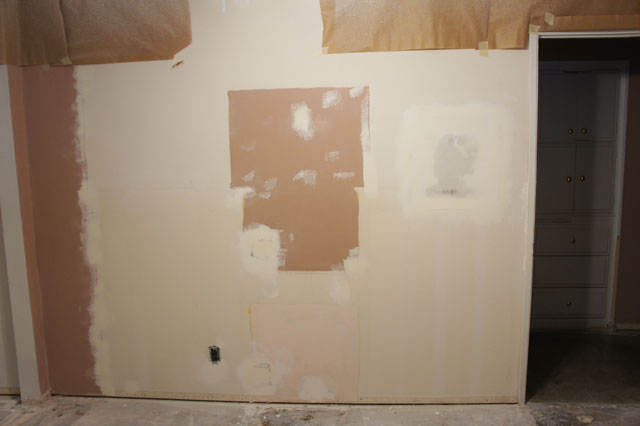
By the way, in case you're wondering what the hell is going on with the wall, there was some very-difficult-to-remove wallpaper there. Once I decided to wood panel the wall, I realized that further wallpaper removal efforts were pointless. Keith draw his blueprints on the wall, and since it looked like some kind of goofy world map, he started writing names of countries on the lighter-colored blobs. Keith has a unique sense of humor...

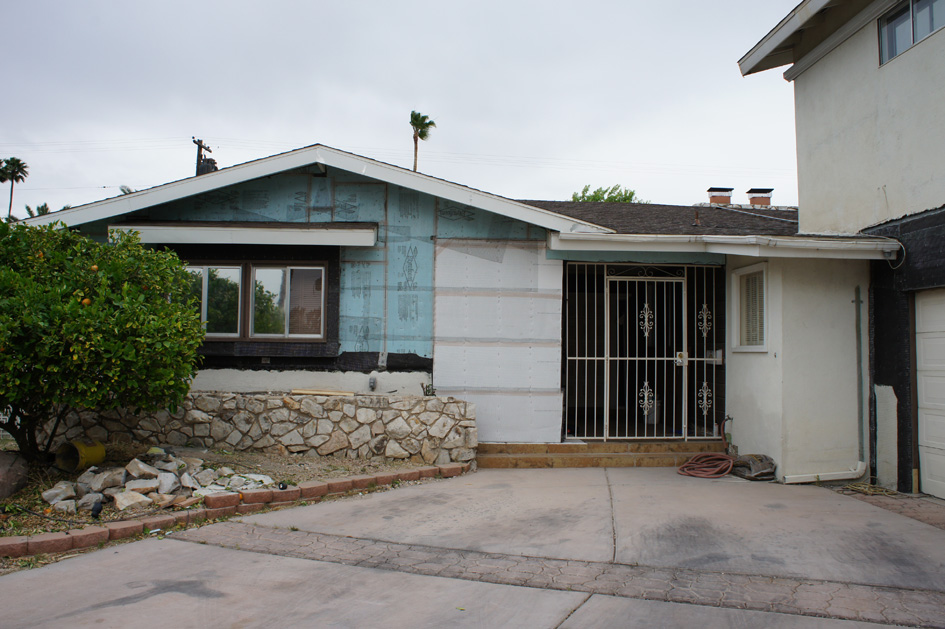
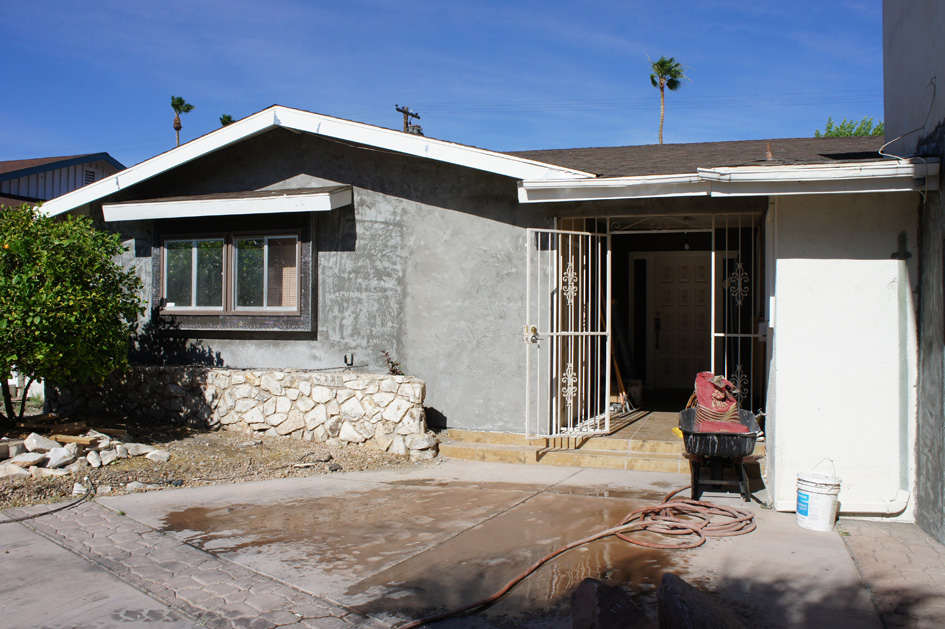
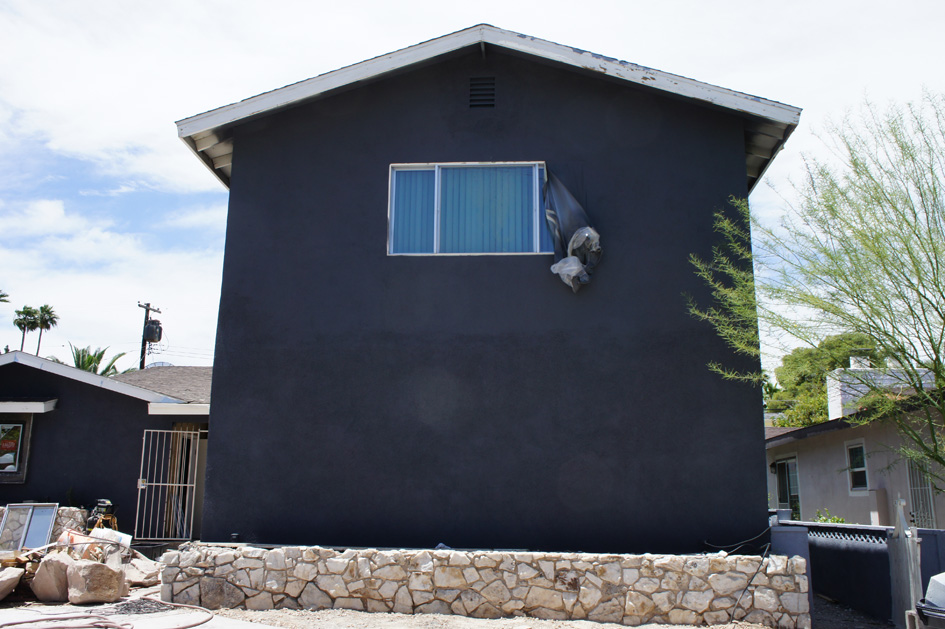
Here's what it looked like outside after the intital stucco cutting:

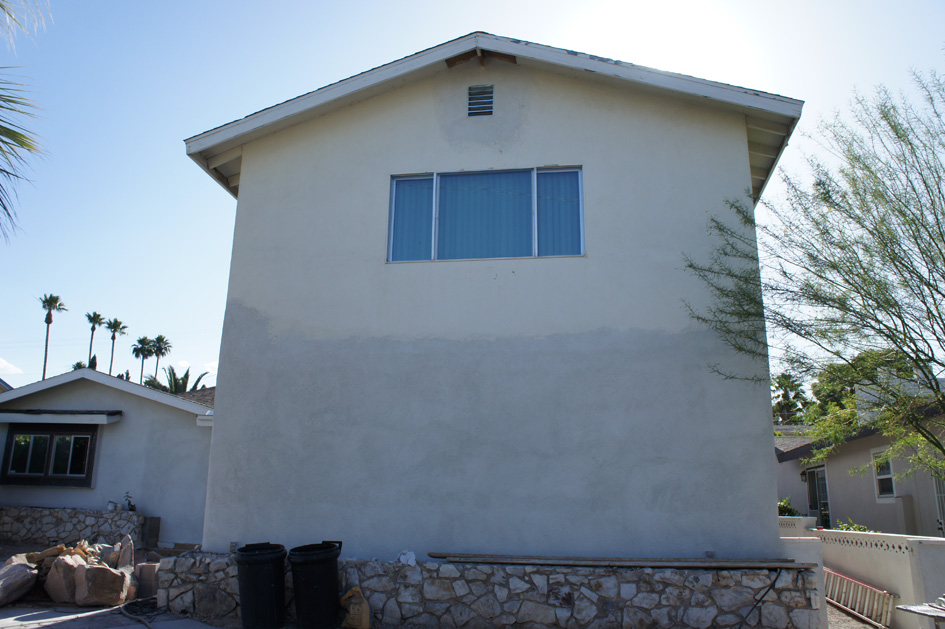
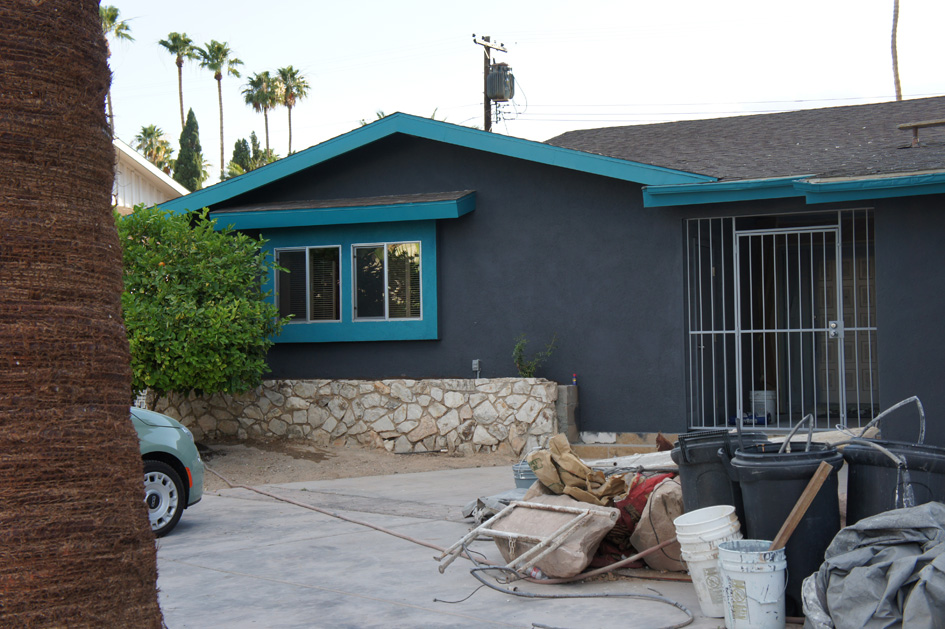
And after. You might notice the house exterior is a different color too (took this pic today because I didn't have one!).

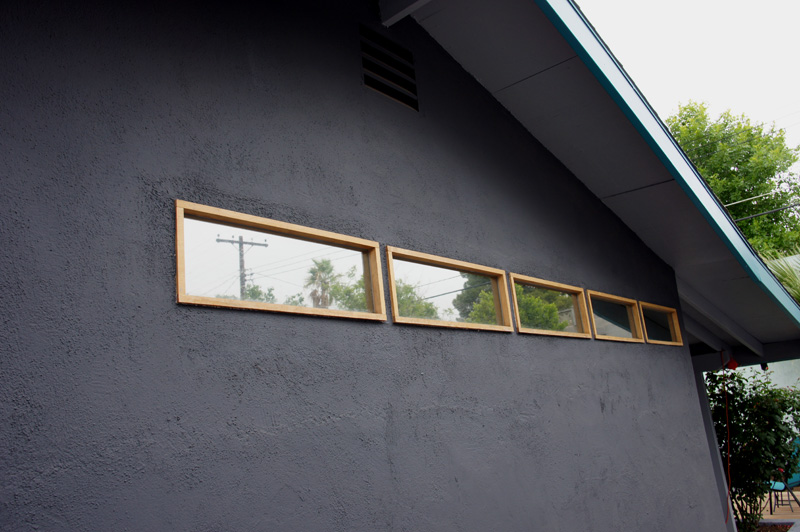
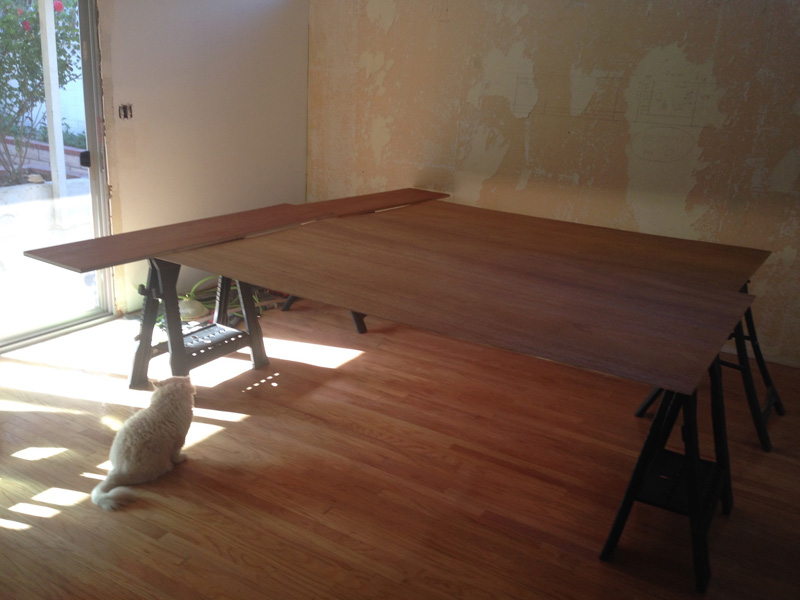
I didn't take a lot of pics of the wall paneling project, but suffice to say, it's 1/4" Luan procured from the local wood place and finished with Danish Oil and polyurethane. Here's Lester during the finishing process...

... and putting it up. I affixed it with lots of Liquid Nails, followed by more pneumatic nail gun fun. Kachunka.

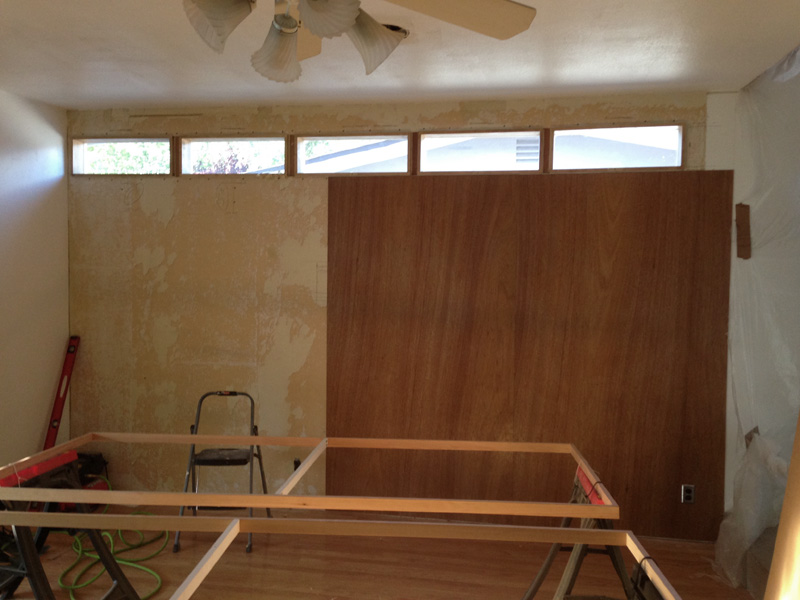
It's a little tricky cutting for outlets and switches; measure careful-like followed by jigsaw. Obviously, I had to cut pieces for above and below the windows, but it was sort of a blessing because this room has a sunken floor. This means the ceiling is about six inches taller than a standard eight-foot residential ceiling. Fortunately the windows accounted for the extra height, otherwise I would've run into problems because the plywood is only eight feet high. When I was done, I did a lot of quarter-round trim pieces on the windows, ceiling, and the right side to make it look pretty and cover up alignment boo-boos. I also cut (and carefully shimmed) little pieces of Luan plywood trim to go into between the window frames (otherwise you'd see the 2x4 studs). If you look really close, you can tell I'm not a master wood worker, but I'm pretty happy with how it turned out. And the room is a whole lot brighter. Fortunately, the sun never directly hits that side of the house, so the lack of blinds isn't an issue.

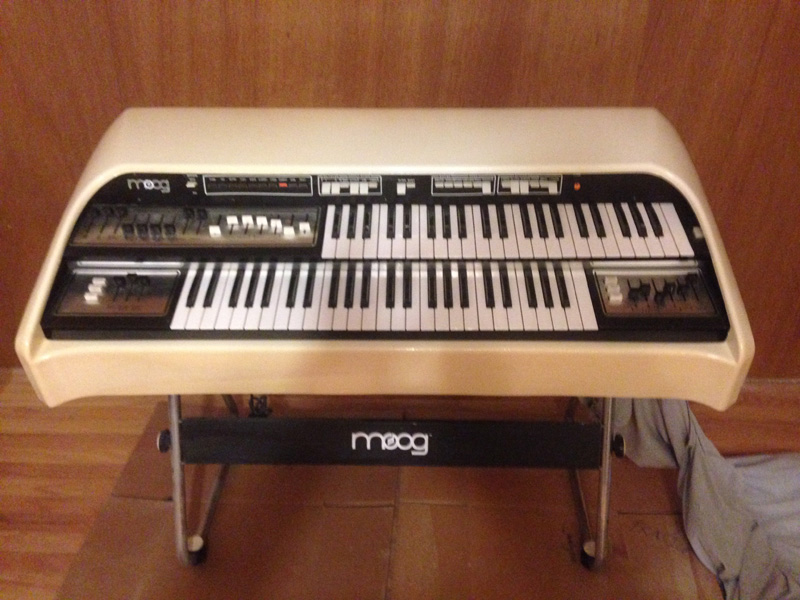
• Organ! This a Moog/Cordovox "white whale" organ from the 70's. The organ part sounds like The Doors, and the top keyboard has a sort of preset Moog that makes silly weow-weow noises. I got it because it looks awesome. It needs a little TLC and I need to figure out a suitably silly amp for it (and maybe a bad "crickets" beat box too). 

• Fireplace wall... I knocked out the little wall to the left when I first moved in, so there's clear access to the living room/kitchen on either side. The wood flooring was removed from the "step" on the left; it's now polished concrete like the rest of the floor up there.

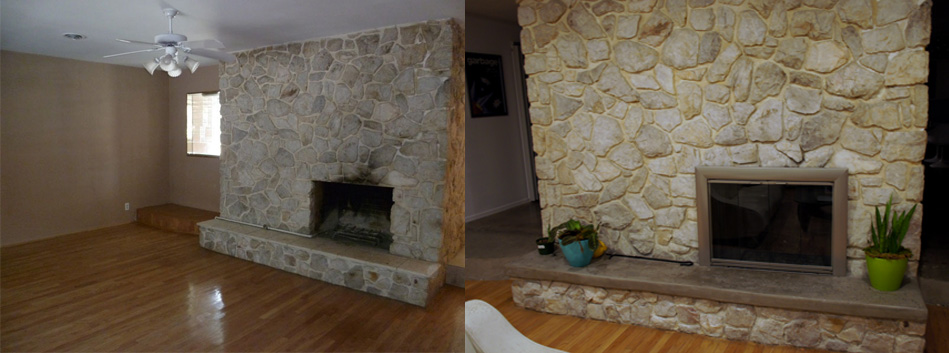
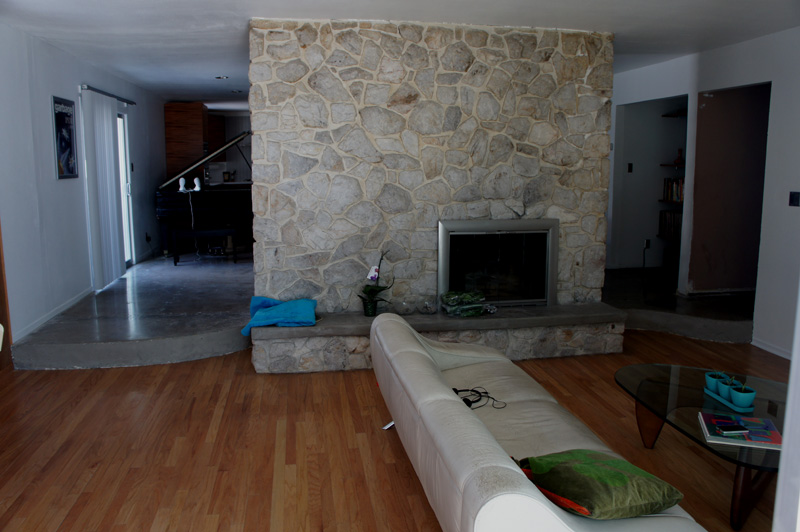
The fireplace was another thing I put off forrrrreeever because I wasn't sure how to deal with it. Here's the before shot:

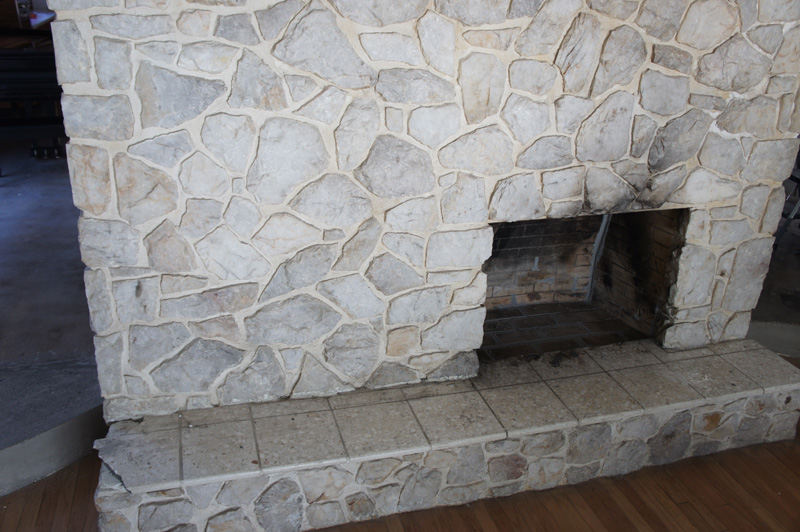
It has thick stone tiles, some of which were pretty badly burn/stained (and obnoxiously cracked on the left). I thought these were super ugly, and researching fireplace hearths didn't really yield any other non-super-ugly ideas. What I really wanted was polished concrete like the living room and kitchen, and everyone I asked thought this would work fine (BTW, the fireplace is a "double-dutch," i.e. there's one one each side, offset from each other, so there are actually two ten-foot long hearths).

The concrete guy I used, well... let's just say he's a well-intentioned guy, and he didn't charge me that much, but he messed up the first one and had to redo it, and it took over two months (!) for them to get the job done. And they made a HUGE mess of silt sanding the surfaces. Anyway, the idea was to embed pieces of crushed glass for some bling value, but the glass isn't that visible.

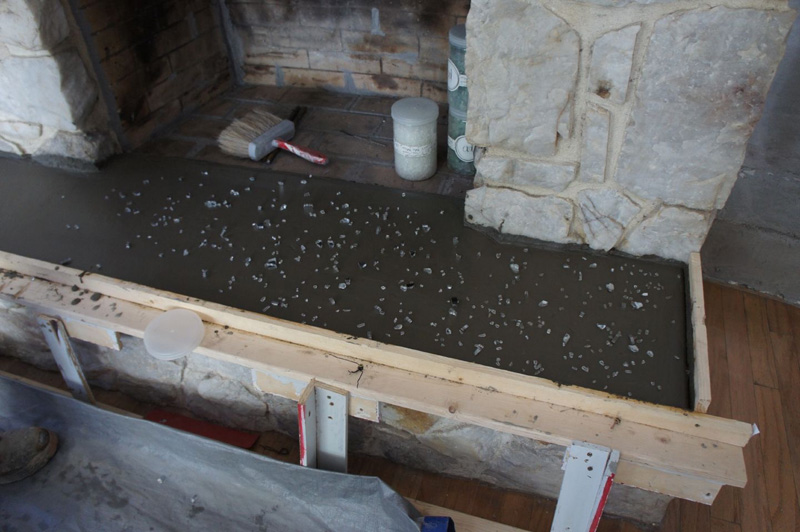
That said, they still came out fine, and other than the immense amount of time (and mess they made), I'm happy with the end result.

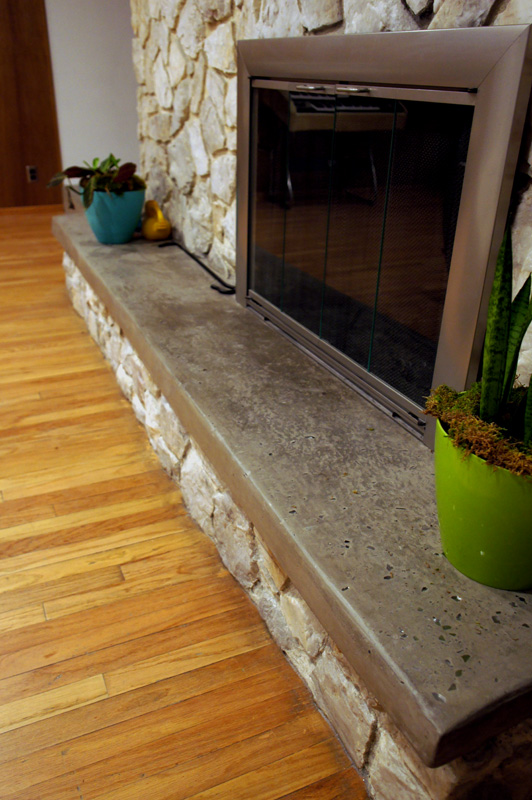
I also got two custom-sized fireplace grills. It's insanely difficult to find fireplace grills for a non-standard opening fireplace (non-standard because of the giant random limestone), especially when silver is the only color that's acceptable. If you like brass, black, or gold, the world is your oyster in fireplace land. (as an aside, I want to open up a fireplace supply store and call it "Earth, Wind, and Fireplace")

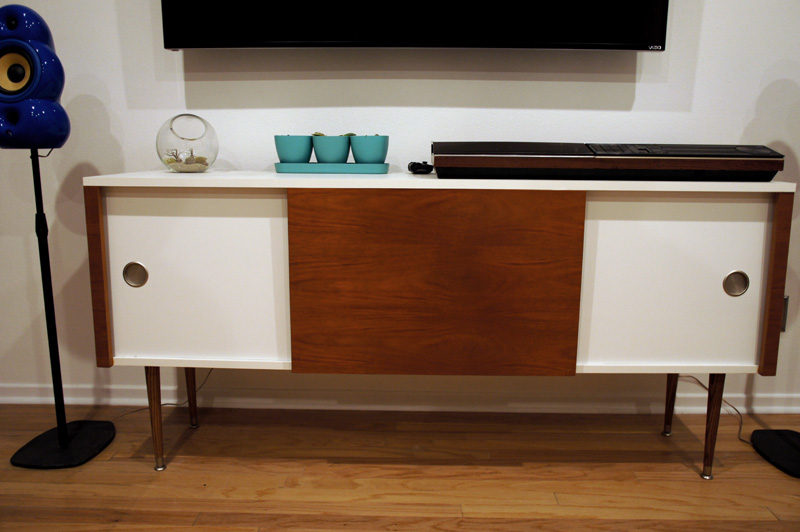
• TV Wall, aka fancy part.

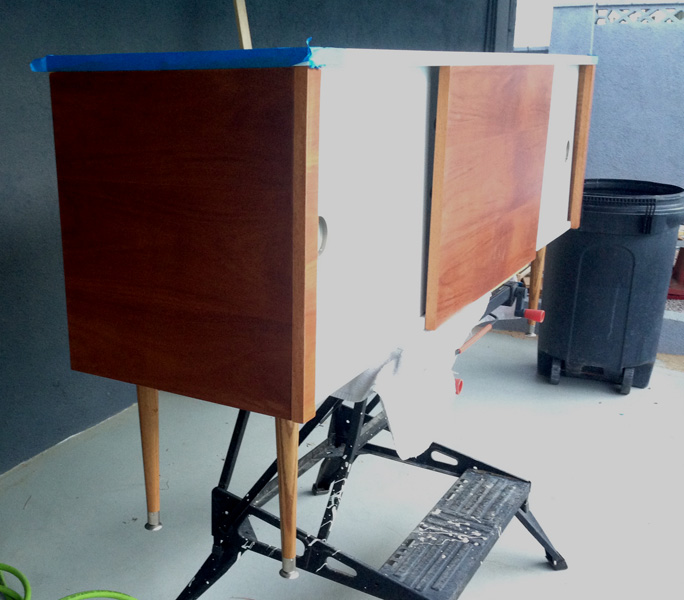
The piece de resistance is probably the custom-built credenza/stereo stand that I designed and built. Don't worry, I'm not blowing too much smoke - I really screwed up a number of times, but managed to fix it, and it came out pretty good. Took forever! I used leftover pieces of fancy mahogany-laminated plywood from built-in shelves I installed elsewhere (that's another blog entry... ). The white doors are made from this pressboard stuff they sell at Lowe's that's intended for DIY dry erase walls. Pretty sure I got the silver "cup" pulls there too. I ordered the tapered legs online, as I don't own a lathe, but they weren't too pricey.

Here's a pic of it almost done. I'm probably swearing because I screwed something up (like I said, this one was a lot of trial and error!).

... and the er, "blueprints."

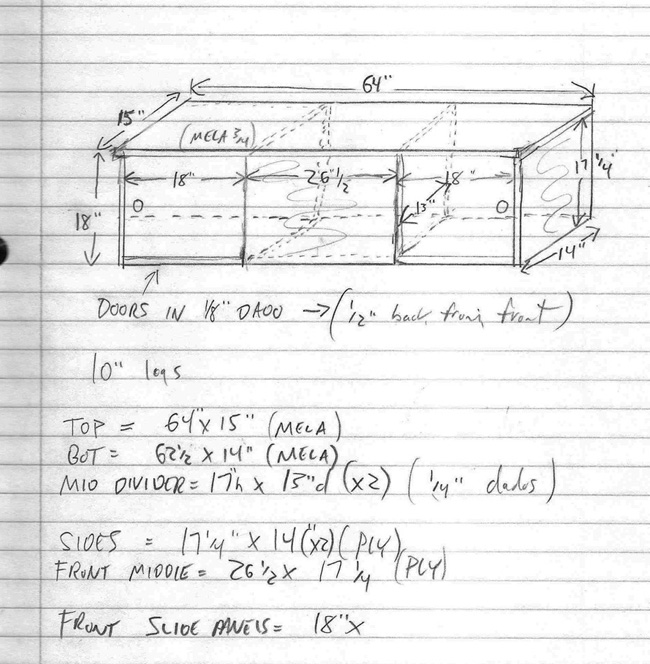
On top of it is my fancy-pants vintage Bang & Olufsen BeoSystem stereo, which is forever breaking. Fortunately (sort of), the only Bang & Olufsen repair place in Nevada is less than a mile from my house. But it looks really cool.

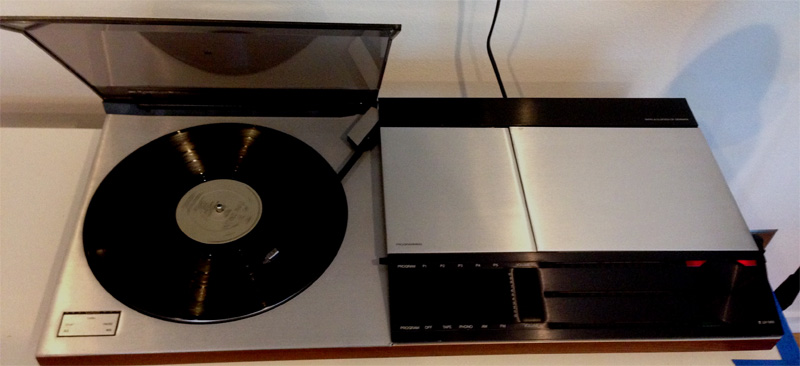
By the way, the credenza was inpired by this:

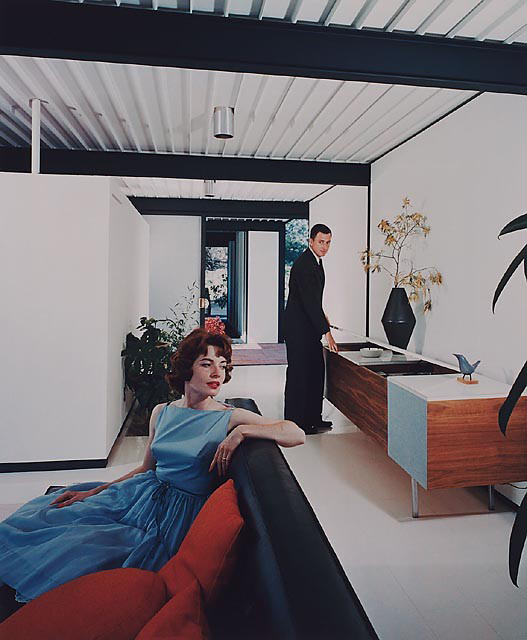
That's a pretty famous photo of a Pierre Koenig Case Study House interior. After some research, I determined it was a custom-built one off. My original plan was to modify an existing Ikea stereo stand (to add the nice wood), but as I got into it, I realized I was using less and less of the Ikea thing, so I just did it from scratch. If you look at a hi-res version pic of the original above, the white fronts are actually grill cloth because it has built-in speakers. I thought about doing it that way for a while, but 1) I already had the nifty blue MiniPod speakers, and 2) I was a little worried about vibration. I'm glad I did it this way because the storage space is nice. I hid wires and my Apple TV box in there (Apple's horrifically oversensitive remote is Bluetooth, thus it doesn't need line of sight, so at least they got something right). 

Speaking of wires... you may have noticed there are no visible wires between the credenza and the TV. That's because I didn't hook anything up. Kidding! I ran everything through the walls. I installed some Monoprice wall hole thingees and added two 120V outlets; one behind the credenza, and one behind the TV. The ports for the HDMI cables were relatively easy, but adding the outlets was a total PITA. How I hate doing electrical! There was a fair amout of drywall patching as well, because I had to saw two holes in the wall to get to everything.

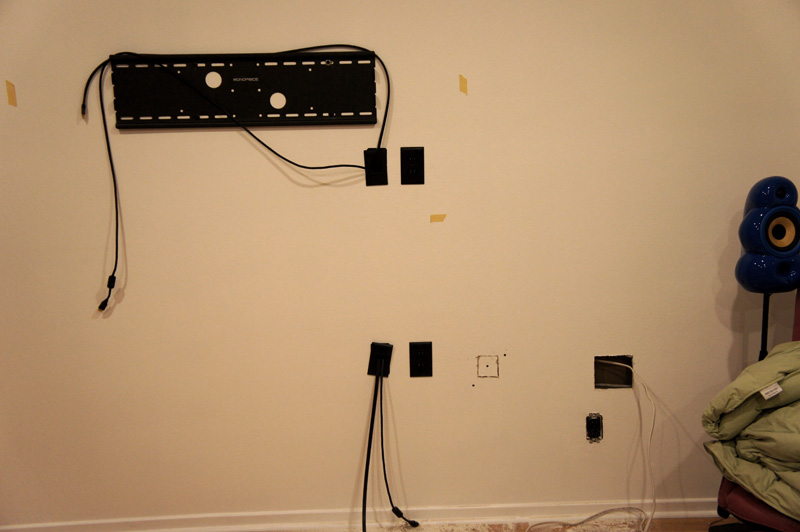
But the upside is that other than the speaker wires, you can't see ANY wires. Hello OCD!

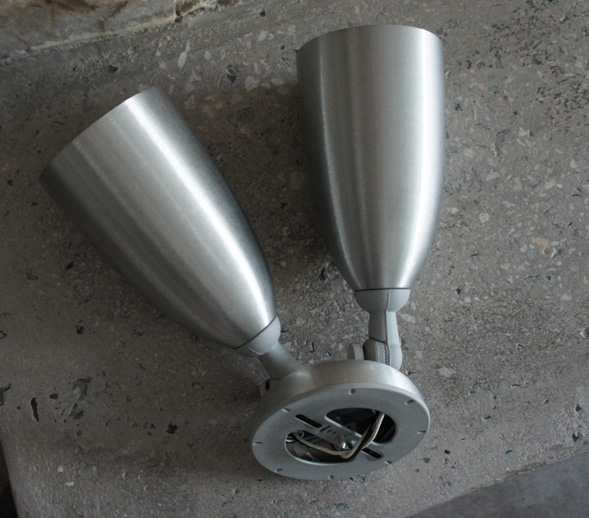
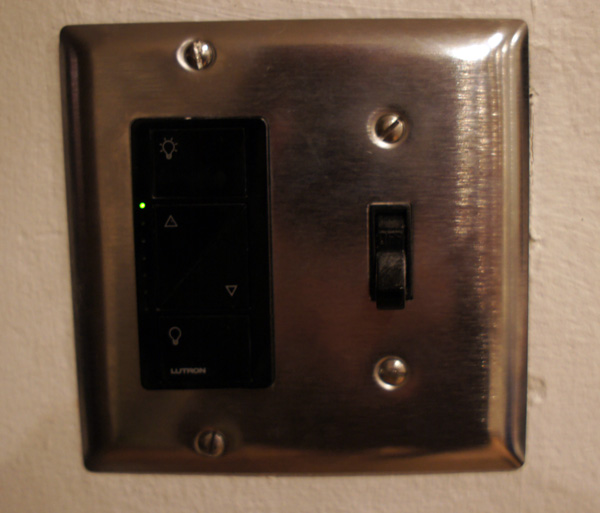
• Lights - Not sure how visible they are, but I had recessed lighting installed. I used GE Reveal LED floods because they're really well behaved with dimmers (some LED's buzz, flicker, etc.) along with a Lutron Caseta dimmer. As far as I can tell, these are the best dimmers on the market for LED's, because many don't get very dim, which kind of defeats the purpose. Not only do these get really dim, you can preset how low they get (depending on what your LED bulbs will tolerate before misbehaving. Mine went full low, holmes.). I also got a remote control for it, so I can turn down the lights and get all sexy-time without getting up and walking four feet. Of course I had to order the dimmer online, because none of the dumb big box stores carry black. It's a beige world...

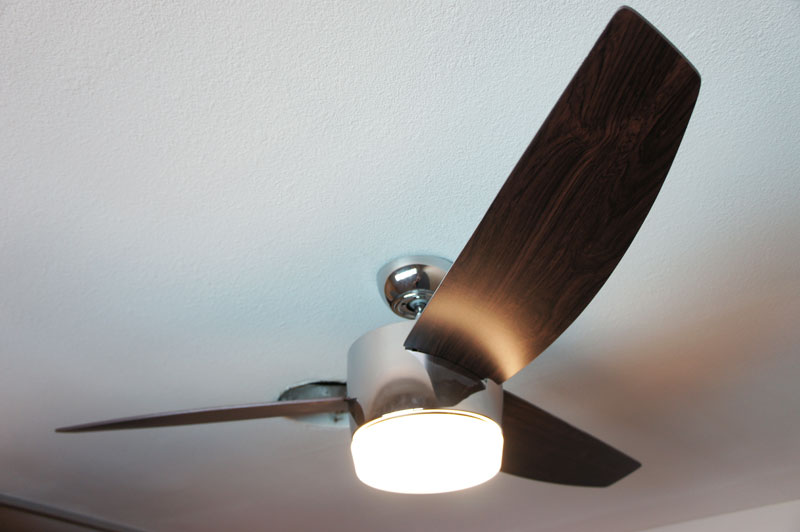
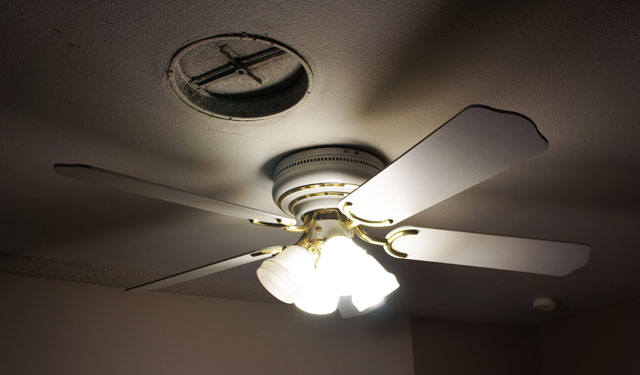
It should go without saying that I took down the ugly-as-sin ceiling fan when we put in the recessed lights.

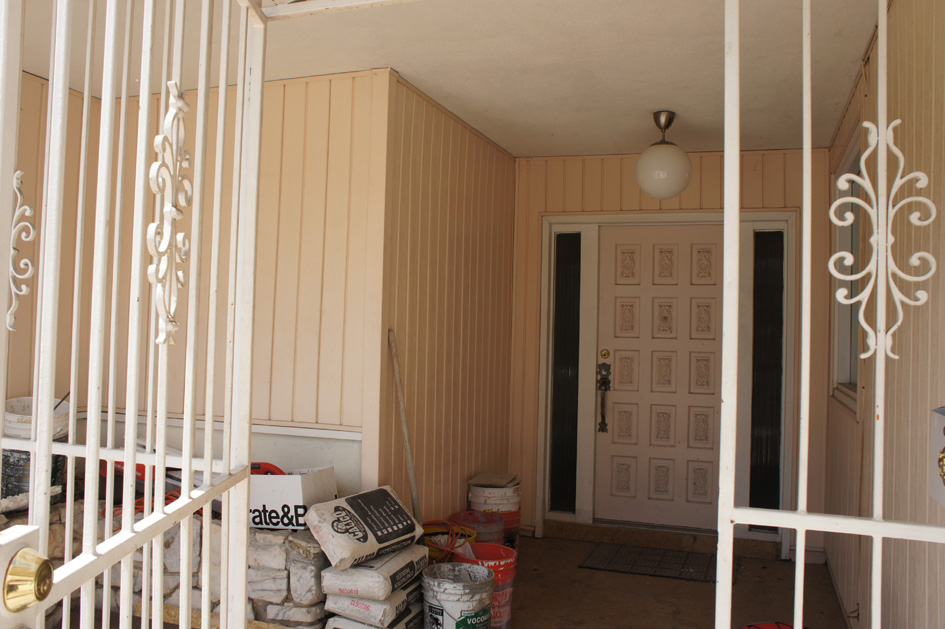
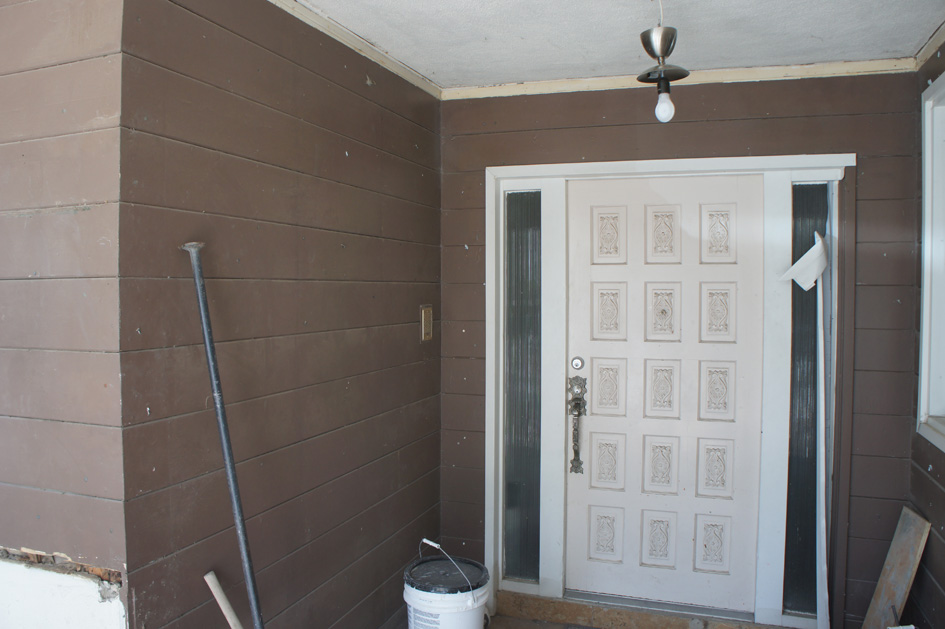
Think that covers the family room. Next I'll show y'all the in-progress foyer and hallway...

Tuesday
Jul142015

Super duper mega outdoor remodel. Part one of many.

I had been planning on renovating the outside of my place since I moved in, but frankly, there were so many things to be done, many of which depended on each other in various ways, that I simply put it off forever. To make a long story short, my pal John put me in touch with Sammy, the multi-talented contractor who had painted his house, and he agreed to take on this very huge project consisting of:

- paint the house

- repair and stucco front, side, and yard cinder block walls

- remove decrepit vinyl siding from house and stucco

- construct a storage closet in my porch area

- build a wood deck in yard

- replace various doors and windows

- jackhammer and dispose of all concrete on sides of house

- resurface pool and patio areas

- remove/redo entire landscape

- install irrigation and run 12-volt power for Malibu lighting

As you can imagine, this was an immense undertaking, and I'm happy to say that it's almost all complete. It took about two months of contractor Sammy (and his sometime assistant Lorin) busting their butts to make this happen, and they did an amazing job. I have hundreds of photos, so I'll try to break this up as best as I can. I won't attempt to show things in the correct order because the contractors jumped around a lot; instead I'll try to show sections in order so it'll make more sense.

First thing they did was remove a bunch of vinyl siding and apply stucco in its place. I presume this stuff was pretty nasty even when it was new, but now it was old, faded, and prone to cracking apart. I felt that stuccoing where it was would simplify the lines of the house. I didn't take a picture before they started, but the vinyl siding is pretty visible as they tore it off. Unluckily for me, there was no existing stucco beneath it.

See the window in this pic? This is actually my garage; I thought having a window in there was real dumb, so I had them remove it and stucco over its previous location.


You can really see the vinyl crap in this pic of the entry way. Since the that entire "nook" on the left is wasted space (especially with the gates), I decided to have them wall that off and create a storage closet.

As you can see, there's a limestone bed there, so they had to chop that out, and remove the section of the gate in front where the wall was going to be. Noisy there!

To my surprise, removing the vinyl in the entry way revealed tongue-in-groove wood siding. My original intention was to stucco the entire entry way, but the wood was in decent shape, so I decided to keep it and paint it. Would've been super nice if it was a natural wood tone, but stripping that stuff probably would be more difficult than tearing it out and starting over again. Maybe in the future?

Betcha don't have one of these. I could never figure out why there was only one intercom in the back of the house. Now I know where the other was. It would've been fun to get this guy working again, but because it's behind the gates, it would've been useless, so I tore it out and painstakingly patched the hole with some of the new tongue-in-groove siding we used for the new storage closet facade (i.e. careful cutting and shimming). I'm proud to report that the patch is almost invisible.

Pow! Now there's a storage closet. Contractor Lorin framed the walls ridiculously fast (and had to account for the weird slope of my entry roofline). They also got me a solid-core door which I spec'd to open outward in order to maximize the space. Door knob is a Schlage Orbit in brushed chrome. I ordered a LOT of Schlage knobs and locks and now every lock in my house uses the same key. We used standard tongue-in-groove siding from Lowe's which matched pretty well. (not exact, but the original was an oddball size).


This should give you an idea what a mess the place was becoming. I bet the neighbors were freaking out...

Here you can see they've already built the wall where the closet will be (it's the white foam part... that used to all be gate/porch). At this point, they've attached foam and metal lathe to attach the stucco to.

Hello Lester. 

 I'm gonna jump around a little to give an idea of what things looked like once the stucco went up. This is what they call the "brown coat" (even though it's really more gray). It's a thick coat to get everything leveled how they like, and later they'll apply the texture coat which gives the desired... you guessed it... texture. You can also very clearly see that the first-story window is gone.

If you look at the very top of the above pic, you can see a shiny new attic vent. There used to be a "faux bird feeder" as I like to call it. In my minimalist mind, this was an ugly and pointless flourish, so I had it removed. Sammy destroyed it with a sledgehammer in about five minutes flat (he likes to break stuff). Here's a not-very-good old pic of it I dug up:

Other half...

... and the garage side.

aaaannnnd with texture coat. Starting to look like a proper bland beige Vegas home, but trust me I'm gonna screw that up big time.

I see a beige house and I want to paint it blaaack... WTF? Ok, not really black, more like a charcoal gray. It looks sort of like a haunted house at this point, but trust me, it gets better.

Oh yeah, and here's Lorin installing new windows. The old ones were NASTY single-pane weather and security nightmares. These are brawny (and have nifty built-in pin locks). They actually installed a number of windows and I'm happy to report I have zero nasty old windows left.

How about charcoal with light gray and teal trim? Because when you own your own home in a no-HOA old area, there's nobody to stop you from making insane decisions. Yay! That white stuff around the window is foam for a teal trim pop-out. This was a late-in-the-game idea and Sammy wanted to kill me. I'll have a picture of how this turned out later on (I don't have one that doesn't have the new landscaping!).

If you look closely at the gate, you'll notice that the "fleur de twirlies" are gone (see below pic). Prior to painting, I went to town on those bitches with a set of Channel-locks and an angle grinder. Sparks were FLYIN', and I felt like a real man (or Jennifer Beals at her day job). Hard to see in the above pic, but the ghetto $14 special deadbolt and accompanying cheapo handle got replaced with more new fancy brushed chrome Schlage hardware. I don't have any pics, but my electrical contractor tapped power off the outlet in the front bed for a light and utility outlet in the new porch closet.

 Here's the storage closet with paint. Because the porch is already dark, we decided to go with the light gray trim color for the whole thing.

This will eventually be over the garage; I still need to have power run over there. It's a Remcraft; these are the business if you want authentic, minimal, brushed metal mid-century outdoor lights. I bought a couple others for the side of the house which I'll show in another entry. They ain't cheap, but there's almost nothing else on the market like them. I'm going to see if I can modify the fixture with a light sensor to make them turn on and off automatically.

Here are my not-exactly-Neutra address numbers (please excuse the totally unintentionally arty lens flare). They're basically knock-offs of these, which are almost comically overpriced at $27 per number. Really?!? Lucky for me, in an unusal foray into moderism, Home Depot sells these knockoffs for six bucks a pop. Getting 'em in even is tricky business, but I pulled it off with included templates, a level, a drill, and a tube of Liquid Nails.


My slick porch was gonna need a slick mailbox, so I bought his bad mofo. Modern mailboxes can be appallingly expensive (as in $500... again, really?!?) but this was only $113 from Amazon. I painted the mailbox door using the same teal paint my contractor used for the trim accents.

I'm still waiting on a replacement front door to replace the awful "conquist-a-door" that was there, that should arrive in a week. And I'm also waiting on a piece of glass for the sides of the front door. Once that's done, I still need a concrete guy to remove the ugly brown tiles from the entry and pour concrete (and maybe polish it).

That's about it for the front of house stucco/paint. Next entry, I'll show all the brick/stucco/wall madness!


Sunday
Jan182015

One down, several to go.

Roughly six months back, I posted about the middle bedroom. It was a hot mess back then, but lest y'all think I've been doing nothing for the last six months, I've actually been slowly whittling away at it, and hallu-however-you-spell-it, it's done. (Have a look at the previous post to see what this room used to look like.)

For starters, I installed the laminate wood floor. I bought a TON (probably literally) because I wanted the floor in the master bedroom to match, so there's still another 500-ish sq planktons of this stuff complicating motorcycle parking in my garage. I did the install myself, and this was probably my last DIY floor install, because I hate doing it. And once you install the floor, it's even more tedious installing new baseboards and quarter-rounds. That said, you can't beat pretty, freshly painted baseboards (that don't have thirty coats of accumulated paint) for that new car/room feel. 

Also clearly evident in the above pic is the fancy-pants wallpaper I procured from Germany. My friend commented that it was "very Stanley Kubrick," which warmed my little heart. The guy I found to install the wallpaper did a great job, but he charged a little too much and talked WAY too much. He also gave me quote of five grand to remove the stones from my fireplace hearths and concrete them. Oh yeah, that'll happen. 

The window is also brand new; same 2'x8' OXO format as the old one, but modern double-pane, low-E glass. The way it fit left a sizable gap on the inside which I fixed with a sort of flattened quarter-round trim. More fun with angle cuts! (and reason to use the new Kobalt miter saw I got over Christmas). Also ordered and installed new blinds (the window previously had some hideous shutters that were falling apart). This time around, I discovered the miracle of multiple horizontal blinds (aligned to each window segment), all on one rail. Wish I knew about this magic when I did the studio upstairs. A little difficult to photograph during the day, but trust, me they're gray. (If it isn't apparent in the pics, the wallpaper is multiple shades of gray, and I had the paint place match the lightest shade of gray for the walls).


Let's talk closet doors... way the heck back I built DIY closet doors to replace the hideoustastic mirrored jobbies in there. They ended up leaning against the wall for a year-and-a-half, but they're finally up. Along the way, I learned that leaning them was a bad plan, because they a bit from top to bottom, but fortunately not enough to make them unusable, and it's not really too noticeable.


You may notice that the right set is missing the trim piece on top. After I tore the house apart looking for it, I realized I never actually made the second trim (I found the piece of luan plywood I had intended to use, because it was pencil-marked at the correct dimensions!). Anyway, that guy is in the multi-day stain/poly finish process, and will be up soon. One big change I made was that the original doors slid along a track at the bottom, but I got rid of the track and used hanging hardware instead. I hung them because I wanted the laminate floor to run continously into the closets. If you look close, you can see the guides on the floor that prevent the doors from swinging forward and back. I actually double-stick taped the guides because I wasn't thrilled with the idea of drilling holes in my newly-installed floor! 

I installed a fancypants Elfa closet organizer in the right closet, courtesy of the pushy salesfolks of The Container Store. It isn't the cheapest solution, but I quickly discovered that replicating the same kind of thing at the big box stores is no cheaper, so at least you have tons of options with the Elfa setup. This was mainly done for Kim, as she was kind of lacking places to put her stuff. 

I wasn't sure we needed to go closet organizer crazy with both, so I built a basic shelf and rod arrangement in the other closet using salvaged wood from the giant built-in I tore out of the room. Not only am I Capt. Recycle, but it was all stained real nice, so it looks classy. This was also another opportunity to go nuts with my new miter saw. I only had to go to TWO Home Depot locations to find four of those brackets in silver. (this being another example of "the world is your oyster if you like brown, white, gold, brass, or beige")

I talked about the fancy fan in other posts. We had to move the location of the old fan, because the nitwits who originally installed it apparently were unable to unravel the elaborate mysteries of locating the center of a room. Ugh. Other than wishing the blades were a lighter shade of fake wood (that's a good name for a song), it's elegant and lovely, and far less offensive than most ceiling fans. You can see the HVAC hole in the ceiling where I still need to get a vent cover. I want it to be square, because round ones work poorly, so that's probably gonna be a pain. 

I also replaced the door. The orginals all have 14 coats of paint, and I really wanted the wood vibe. Since there are four other doors nearby, and doors get pricy quick, I went with basic luan slab, stained with my beloved Watco Danish Oil in Golden Oak; it's a pretty swift way to spice up a cheapo door. I had handyman Keith install it, as door alignment is somewhat of a black art, and he's really good at it. Like all other new doors in my house, it's got the classic Schlage Orbit knob in nickel and matching nickel hinges. One day I'll have all the gold and brass out of this place! 

The bed and night stand are kind of temporary... my Ikea Malm bed has been sitting disassembled in my garage for three years (the mattress and box spring has been in my familiy room!), so I put that whole mess back together, as this is intended to be a bit of a guest room. I've grown to really hate what I refer to as "picture of wood on particle board" cheapo furniture, so I'm on the lookout for a nicer bed. We're planning on getting rid of most of what's in there, but we wanted to end up with a wide dresser and a desk. 

With the bed in and everything done yesterday, I went snooping on Craigslist for furniture, which is usually a complete waste of time in Vegas (you wouldn't believe the junk people try to foist as "mid-century" here). To my surprise, this guy popped up (listed twelve hours prior):

This is a Kibaek Mobelfabrik teak dresser (in other words, some Scandinavian company from the 60s or 70s), for the bargain price of $300. I picked this up from a nice couple in Paradise Palms who got it along with a matching bed but didn't need the dresser. It weighs a ton, and required some fancy footwork to get in the house, but I prevailed. Only let down is that I discovered that it's not solid teak- it's actually teak veneer on particle board, but I'll take real wood veneer over a fake picture of wood any day of the week, and the price was right. It looks a little more 70s than 60s to my eyes, but I still dig it, and can't believe I found this in Vegas. 

Here's another "hold the camera over my head" shot. Kim had this neat framed poster, so I screwed a drywall insert into the wall and threw it up. And I had the nifty translucent Ikea lamp laying around forever, so I threw that in there. I'm now wishing the outlet behind the dresser had a switch by the door, but that's certainly do-able in the future. 


Sunday
Jun012014

The Dreaded Middle Room

Just when you thought you'd never hear from me again... though I'm pretty darn lazy about posting progress these days, I've been whacking away at this bedroom for months. In case you're reading this and think to yourself, "man, he's really getting things done!", bear in mind that some of these photos date back almost a year (!). At this rate, I'll have the house all done when I'm 117 years old. With all that out of the way, this is a 15x13 room at the back of the house. It's gonna be the guest room/room Kim somewhat makes her own and puts stuff. Here's what it looked like when I moved in:


The room was pretty well dominated by the hulking built-in. I contemplated keeping it, but it was a little too traditional for my tastes, so I demoed the whole mess (well, sort of... I still have the tall dresser sections intact). It was REALLY WELL built out of serious plywood and solid wood, which made it hurt even more to kill it. I should've taken more pics as I went, because it was a serious PITA to get apart, compounded by the fact that I did it alone- could've used a couple more limbs and more muscle.


Since the built-in covered so much wall, they went ahead and cut themselves a big ol' sloppy hole in the wall for electrical which I got to patch. I also had to remove and patch the two outlets in the middle; the top one for obvious reasons, and the bottom one because it was way too close to the floor (apparently the possibility of an indoor flood didn't exist in 1963). There was also a switch in the side of the built-in by the door that operated one of the outlets, so I had to reverse engineer that so the "new" outlet would always be live.To the left and above that low outlet was a little junction box, so after unraveling the wiring, I turned that into aforementioned "new" outlet (because it was at a more appropriate height) and removed/patched the low one.


Here's what that wall looks like now. BTW, you can see the little square of pink at the bottom. I assume the entire room was pink at some point, indicating it was the daughter's room. Unless the son was a little light in his Keds...


Anyway, I was pretty proud of getting most of the built-in apart without breaking anything. Now I have a ton of wood and god knows what I can use it for.


Lester inquires as to whether he may be of assistance. (actually I caught him in a yawn... why are you tired, cat? I'm the one doing all the work here.)

I found the newspaper below, dated January 18th, 1963 buried deep within. This was obviously placed there intentionally and proves the built-in was constructed at the same time as the house. Neat-o, eh? (Yes, I saved it.)


Sometime around all this mess, I fixed up the cable/internet connection with nice plates and properly ran the wires through the walls. This was all covered in this entry.

After months of procrastination, I recently got back into it. First thing was to remove damnable brown carpet. I yanked out all the baseboards, then I cut the carpet lengthwise into roughly four foot-wide strips. Since the window doesn't have screens, I simply tossed them out the window into the yard. This was the easy part. Unfortunately, beneath the carpet was padding which was glued to the concrete slab with The World's Most Obnoxious gooky mastic crap. A regular metal drywall knife didn't stand a chance against it, nor did the long-handle scraper you see in the pic of the room, so I bought a seriously heavy-duty scraper:

I didn't fare much better with the megascraper, but on a whim I tried spraying the mastic stuff with some powerful orange cleaner/degooker stuff I had. This helped a lot, but it was still no walk in the park. It also stunk up the house with citrus nightmare for days. In the future (I have two more rooms with carpet), I may call the guy who polished my concrete floors to see if he can just grind 'em down.


I found an interesting hole in the bottom of the closet - a little research revealed this is a standard size for a cylindrical safe. Won't do me any good though, because I'm doing laminate floor over it.


I also yanked out all the shelves, closet rods and supports. I'd describe these as an overpainted, warpy bent, hot mess. Good riddance.


Here's what the closets look like now. I'll explain the brown masking paper soon.

Next problem... apparently the ceilings were all popcorn textured at one point and they redid them with a subtle knockdown texture. When they redid them, the dummies didn't bother to redo the closet ceilings, nor the ceiling above the built-in (admittedly, this wouldn've been almost impossible without demoing it), leaving me with this:


And this:

In the pics above, I've actually already started removing it. The good news is that popcorn ceiling is pretty easy to remove, you just spray it with soapy water and scrape it with a drywall knife. Only downside is that it makes a mess. And that you have to do something about your now-naked ceiling so that it matches the rest of the texture... if you've read my blog for a while, you might remember that I had to texture a huge amount of the ceiling in the kitchen. This time around, I borrowed a texture gun/hopper dealie from handyman Keith and used it with my air compressor (hence the brown paper, so I didn't hit the walls with texture). Once you get it dialed in so that the texture is similar, it's not too bad. My three-gallon air compressor was a little underpowered for the job (it ran out of air pretty quick), but passable for a small job like this. With that done, I painted the ceiling flat white (with Kim's help). A picture probably isn't going to look like much, but suffice to say, the ceiling is pretty uniform now. You can see little differences in the texture, but you really have to look for it. And as far as I'm concerned, if you spend that much time staring at ceilings, you have far bigger issues to contend with!

What's left...
So glad you didn't ask. Handyman Keith is coming over to assist me in relocating the light/ceiling fan switch. Because of the former location of the built-in monstrosity, they swiftly located the switch on the wrong side of the door (incidentally, an excellent name for a Jim Morrison/Pink Floyd collaboration) as you can see below. This makes things challenging in the dark. We're gonna move that guy over to where it should be by the entry (the attic access is very closeby in the hall, so it should be easy), and I'll patch my 673rd wall hole.


Speaking of ceiling fans, the room came equipped with this horrifically ugly one:


Not only is it ugly, but for some reason it's not mounted in the middle of the room, it's noticeably too close to the front wall. Yay, my house. So... unless there's something up there preventing it (and me and Keith can't think of any reason why, other than pure stupidity), we're gonna go nuts and relocate the light/fan to the middle of the room. Of course this gold and white antiquity ain't staying, it's getting replaced by this...

... which has been patiently waiting in a box in the hall closet for months.

As mentioned, I've already put the first coat of paint on the newly textured ceiling. I'm also making my first foray into wallpaper. A while back I ordered the nifty wallpaper below for the back (window) wall only. I scanned a relatively small piece of it, so you're not really getting the entire pattern here, but trust me, it's cool. The place I found it is a German website called Color24.eu, and if you think you don't like wallpaper, they might change your mind.


The remaining walls will be painted the ligher of the two grays. Home Depot color matched it and I have two cans of paint ready to go.

This room will also get two sets of the DIY sliding closet doors I made a year ago (gasp). I have all the slider hardware for these as well.

I also spent some time looking into closet organizer hardware today, and it looks The Container Store and their fancy-pants Euro Elfa stuff will be separating me from some money.

As mentioned, I'm doing laminate flooring in here. I bought the flooring a couple weeks back from the pushy clowns at Lumber Liquidators, who always seem to be having the SALE OF THE CENTURY, NEVER AGAIN SAVINGS, blah-de-blah. As with with studio, it's a relatively light color, but this time I went with a slightly more rough-hewn handscraped look. I bought enough to do this room as well as the master bedroom when the time comes. I'll have a zillion pics when I'm breaking my back/butt installing it.

Finally, the other Monster Project for this room (and a big reason for my procrastination) is window replacement. All the windows here are single-pane blurry awfulness, so we're gonna cut out the existing 2x8 OXO window and replace it with a new low-E, double-pane new one for weather protection and security. This will surely be a mess and hopefully not destroy the wall too much. Wallpaper will definitely wait until this is complete.