TL:DR version of Mid-Century Malaise blog… this blog documented the roughly decade-long renovation of my old house in Las Vegas. This previously lived on an older version of a Squarespace-hosted website. The only way to move the blog to the current Squarespace site is post-by-post, which is super tedious, so this will slowly be updated…
Paint that somethin’?
2/22/12

I'm not going to even bother to make excuses for how long it's been since I've updated here, but suffice to say, life has gotten in the way of renovation (mainly getting ready for two separate gigs). However, my friends Myke and Steph came in a couple weeks ago and offered a hand painting (four hands, actually), so most of the walls in there are done.
Most noticeable is the "accent wall", which is a pale turquoise ("Tide Pools" is the silly paint color name). It wasn't decided so much by what color I wanted as much as what I didn't want- I wanted to keep it light, so that eliminated all manner of deep blue, purple, etc. I wanted it cool, so that eliminated yellow, red, etc. And I considered light gray, but the room is so monochromatic that I actually wanted a splash of color, so pale turquoise it was (it's a little more saturated in person than in the photo). Since then I've decided I'm gonna do a pale orange for the back walls of the shelves- aka the former "granny cabinet" and "not-wet bar" for those who've been following. That'll happen pretty soon.
Everything else is white, and I didn't go nuts taking pics because in photos it looks relatively the same as when I primed it all (also white). But this is where photos don't do it justice- the difference between dull, chalky white primer and fancy-pants Behr satin screaming pure white is like the difference a flashlight and a 5,000 watt spotlight. Compared to the previous brown pukiness, it's as if the room has been permanently illuminated.

Scale almost correct.
Notice the still-brown HVAC intake vent. I searched all over ye internet and can't find one that big. I want it to be silver, but that one is dented and thus kind of unfixable. I suspect I may just have to have something made and I'll probably pay dearly for it.
In the meantime, I STILL haven't textured the ceiling. I was waiting because there's a big crack in it caused by a beam in the attic that's er, coming apart, but it's not nearly as tragic as it sounds (no imminent danger of the house collapsing). My handyman discovered it a month or so ago. The beam in question consists of a couple of pieces of wood put together and it's severing from old age. He's gonna literally jack it up and repair it tomorrow... not only will this make things more stable, it'll also make the ceiling less sunken and let me seal the visible crack. When this is done, I can texture it, then paint it... which will still probably be a few more weeks because I'm all kinds of busy with work...
BTW, Myke also delivered my nifty Sputnik chandelier, so as soon as the ceiling is ready, that guy goes up where the wires are hanging down in the pics.
Inching into the family room
2/5/2012

As previously mentioned, I've been preparing to texture the kitchen ceiling, buuuuuut.... remember the wall I knocked out between the family room and kitchen? As you can see on the left there's a big 'ol chunk of missing ceiling where the wall used to be (not to mention the missing drywall on the right side wall). Since that portion of the ceiling needs to get textured as well, I figured it would be wise to fix it so I could do all the texture fun at once. I actually did this entire job today- I'm getting pretty good at the drywall and mud thing. I'm still going to have to sand and mud at least one more time, probably twice to get it all nice and smooth, but it's a good start. As you can see below, the ceiling was a pain because there were a ton of big nails sticking out:

Not totally obvious in the pic, but there were about a dozen of them hanging. I cut them down using my rotary tool with a cutting disc. This makes for sparks galore, so you spend the entire time wondering if the sparks will ignite the ceiling insulation and burn the house down (didn't happen). I also got to use my newest tool...
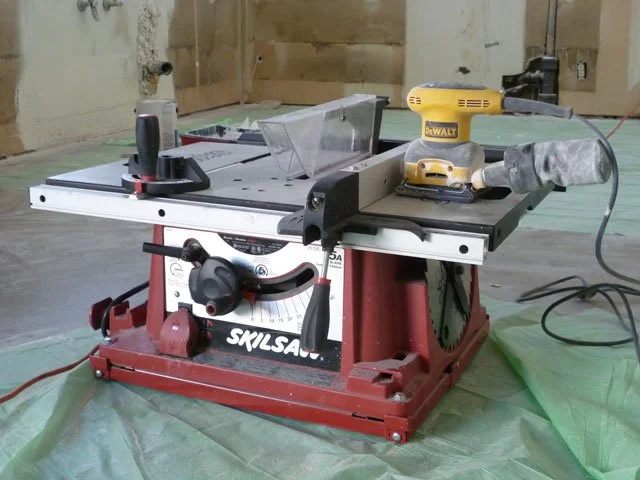
... big mean Skil table saw. I got it and the DeWalt sander (to replace my other that died) for $120 at the local pawn shop. Yet again, I've scored cool stuff for cheap on the backs of the downtrodden. Though it's massive overkill, the table saw is actually great at cutting drywall (though it kicks out a hideous amount of dust).
Only issue left with this entryway is the side of the fireplace:

My original plan was to just shove another 2x4 in there and put a piece of wood trim over the whole thing, but now I'm thinking I might want to actually build wire mesh in there and do grout in there- maybe even add some rocks. I might try and find a masonry person. (Ir)regardless, this isn't pressing. The main thing was that the ceiling had to get done so I could do the texture, and now I can. The bad news is that this month is shaping up to pretty hairy, so my "this old house" time may be somewhat limited in the near future.
Prime-time coverage
1/31/12
Hey, look at that big pile o' snazzy! It's not totally what it looks like though. That's actually primer, not "real" paint. My original intention was just to prime the ceiling in the kitchen area (i.e. the back left corner) to ready it for texture. But I figured while I was at it, I may as well prime the walls. You'll notice there are parts I skipped- those areas will be concealed by cabinets and/or the monolith monster refrigerator.
Took forever though... here's the dumbest thing I've said on this blog yet: big houses are like, big. Makes for a lot of walls to paint! You can't tell from the photo, but I don't presently have 100% coverage on the walls. But I'm pretty sure it's not imperative since I'm painting a coat or two of white over it. I'm sure the primer did make a big difference though, as I'm covering dirt-brown; they must've gotten a deal for taking that horrid color off someone's hands! The walls are all going to be white with the exception of the one all the way on the right in the photo, which will be my chi-chi accent wall. I ain't fer sure yet on the color, but it's gonna be some shade of pale grayish greenish. Swimming pool-esque, but not too crazy intense.
Remember the granny cabinet? I finally fixed that area up tonight (sorry I didn't take a pic). The drywall behind it had never been finished, so it had exposed nail heads, a big untaped seam and no corner taping. Spent a couple hours on that tonight, and tomorrow I'll sand it, touch up the mud, then prime that too. It's gonna eventually get some nice finished-plywood shelving for the collection of cookbooks I do not actually own. One more reason I need to find a wife, right?*
*Brief editorial: I was pondering the other day how no woman in her right mind would tolerate the combination of mess along with my staggeringly erratic start 'n' stop work ethic. In a way, it's a good thing I'm currently single because if it wasn't she'd probably leave me and/or I'd never get it done. I know I actually have a number of kind female supporters, but trust me, if you had to be here for a week, you'd choke me. :)
Back in blog
1/28/2012

Looks ugly, but it's actually pretty smooth, and I believe it's ready for primer. As explained in an earlier post, you just take a very soapy sponge and saturate the wall; this loosens the glue. If you're lucky, it just peels right off, otherwise I scraped with a plastic paint scraper. It's not too terrible, but the wall's kinda big, so it takes a while. I also duct taped the power outlet and light switch and turned off the power to prevent water-related electrical shenanigans. The duct tape did a great job of keeping water out. After that, there were a lot of little holes and various areas that needed patching, but after all my drywall adventures, this was light work. That said, I started moving into the adjacent family room for more wallpaper removal, but it's a different kind of wallpaper and the glue isn't nearly as easy to remove, so I'm gonna have to resort to some kind of plan B. Steamer? Day-laborer? Powerful solvent? Probably the latter.
Moving right along, I also removed some popcorn ceiling. The vast majority of the ceilings are "knockdown" texture (more on this later), but apparently this was a later addition; there's still popcorn in various closets, etc. Remember the "granny cabinet"? When it was in place, it covered the ceiling, but once it was out there was popcorn ceiling above it, so I removed it. (BTW, you can see the difference; the top of the pic is the knockdown, the partially removed part is popcorn).
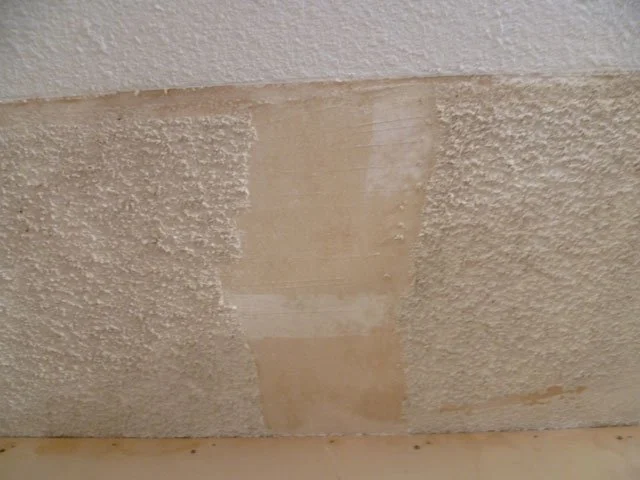
Removing the popcorn ceiling was ridiculously easy. I just got it very wet and soapy with a sponge (a spray bottle would've saved me from the water running down my arm, but I didn't have one), then took the metal drywall joint knife (the thing you actually apply mud with) and it easily scrapes off. Drop-plastic beneath simplifies cleanup.
Finally, I've done a lot of work on the walls and ceiling. I suspect you're as tired of reading about it as I am of doing it (and typing about it), so sorry about that. Suffice to say, making a hodge-podged, swiss-cheesey drywall job look nice is a lot more difficult and time consuming than I expected. I haven't taken pics of all of it, but there are a lot of areas that needed love. Wall edges, giant pieces of wall that were removed to install gas lines, numerous previous light locations, etc., ad infinitum. The good news is I'm very close to the finish line. The other good news is that I'll be attempting to match the ceiling texture in the rest of the room, so the kitchen ceiling doesn't really have to be perfect, because the texture will disguise blemishes. One thing I've learned about a drywall/ceiling job like this is that you could do it forever and ever- carefully trowel mud, let it dry, sand, create Mt. St. Helensesque dust cloud fallout, repeat x infinity. It's really a question of how much of a perfectionist lunatic you want to be about it. It'd be different in a new house, because there aren't a zillion holes, and everything lines up more or less correctly, but in a 49-year-old place, you have to make allowances.
As for the knockdown celing, for those of you not famililar, it's similar to a popcorn ceiling, but while the compound is still wet, they drag a wide taping knife across it, thus "knocking down" the stalagtite-ish edges. It's a bit more subtle. Fortunately I like how it looks, otherwise I'd be in a world of hell removing it throughout the entire house (unlike the above-mentioned popcorn ceiling, it's painted, so the soapy water removal trick wouldn't work). After a fair amount of research, I found the best way to do the texture is to just rent an air compressor/hopper (thing that holds the actual compound)/spray gun combo from Home Depot, so I'll be doing that magic pretty soon here. Just to be safe, I'm gonna primer the ceiling first. It may or may not be necessary- some of the how-to vids I watched said to do it. Here's some before and after fun:
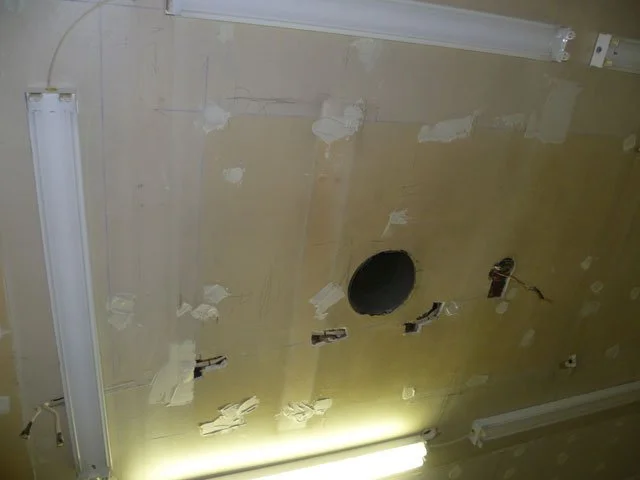
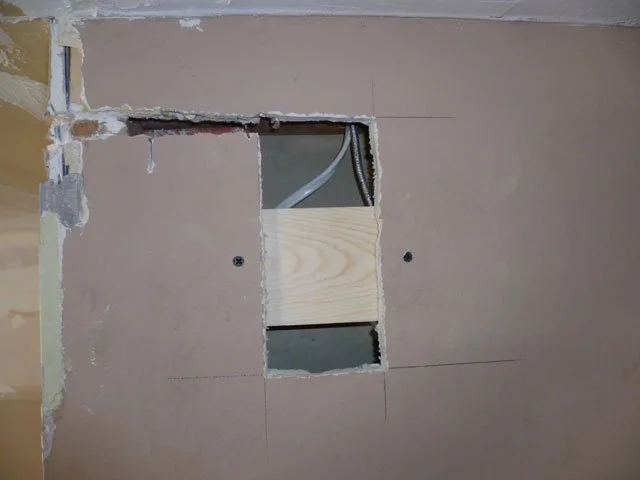
This is about a month ago. Fluorescent lights still in, recessed lights not yet installed. I had already done some sloppy patching (before I embraced the miracle that is mesh tape), but there were still a bunch of irregularly shaped holes from previous electrical- they didn't care about cutting tons of holes because it was all covered up before. These holes were all a total pain in the ass because fixing them entails enlarging the holes with a drywall saw so they'll be rectangular, then you stick a piece of 1x2 or 1x4 across the hole and screw it in. This gives you something to screw the new piece of drywall to (look at below pic and it will make sense). I had to do at least a dozen of these patches (!).
By the way, the one below was particularly super fun because the previous owner had wedged an electrical wire IN the drywall (apparently behind the drywall wasn't good enough), so I had to cut that slot out, and get real creative cutting a narrow slice of drywall to fill it. The wire ran out the through the corner reinforcement (it was previously hidden by the soffit I removed) which was a mess, so I had to hacksaw the whole piece out, replace it, and make the whole mess look like a wall/corner again. Perhaps you're getting an idea of why all this is taking so long: forty-nine years of accumulated stupidity in this joint.
Anyway, below is what the kitchen looks like as of an hour ago:
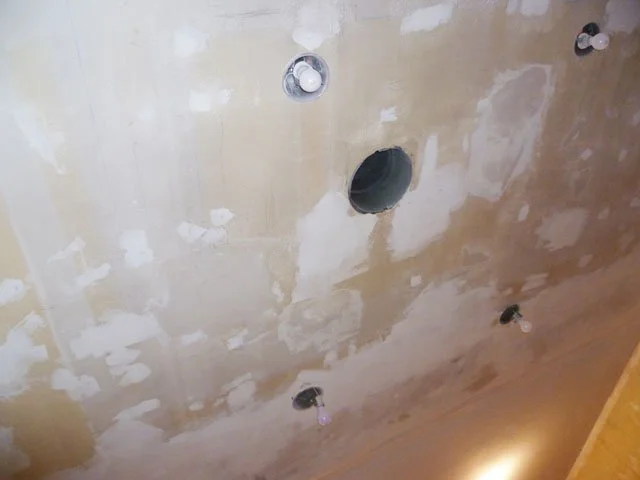
It doesn't look beautiful, but it's pretty flat and as mentioned, took a TON of work to get to that point. You can't really see it in this shot, but the hardest thing was that we replaced almost the entire perimeter of the ceiling drywall because of the previously-there soffits. The pieces were on either side are about 10x3, so that's a LOT of taping and joining over your head. On a ceiling that's a half-century of not-all-that-level. You get the picture. Tomorrow I sand it for the last time and will probably roller on the Kilz (the primer, not the band).
One more thing... the Semi Handmade guys called this week (the company making all my cabinet doors, drawer fronts and side panels) and they're basically done and shipping in the next week or so. I went with mahogany, so they'll more or less look like the lovliness below, minus the silver glass doors that I'm not nuts about anyway. Once I get the ceiling textured and the walls painted, it's time to build all the cabinets (the Ikea frames are currently in a zillion boxes and bags in my garage), and I'm well on my way to a bitchin' kitchen.

Oh crap, nine days since my last entry
12/19/12
Ok, I've been a very bad little blogger. I'd love to tell you it's because I've been SO busy renovatin' and stuff, but that'd only be partially true. I HAVE made some nice progress, but I also must admit that the appearance of Netflix on my laptop+three seasons of Breaking Bad have dented my motivation. Also been out seeing bands (that I'll hopefully work with soon), buying a warm jacket, replacing broken MacBook power thingee, etc. etc. blah. Anyhow...
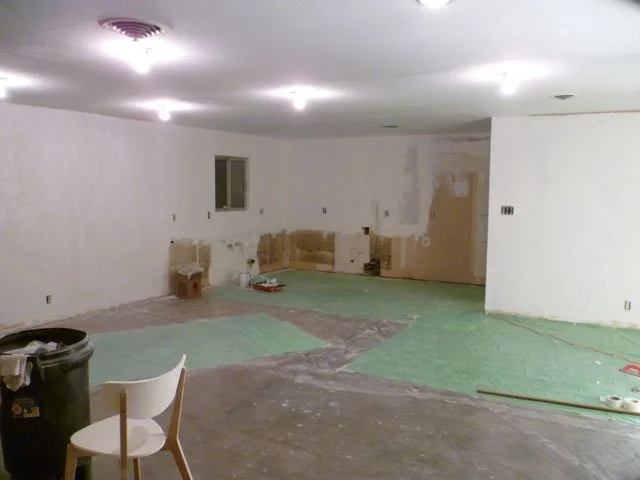
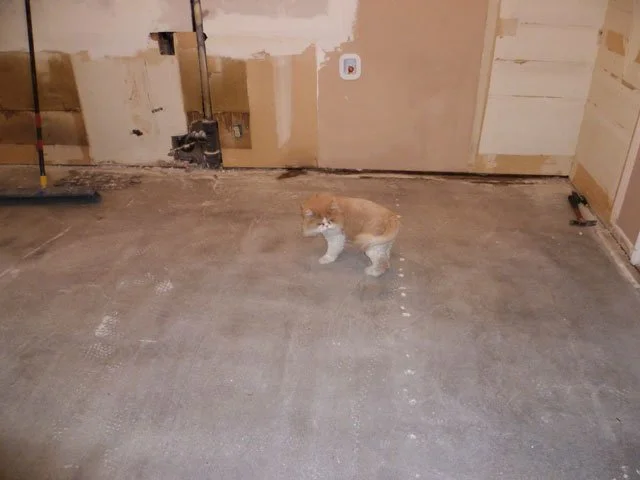
The concrete floors are done, finally. Took them about two weeks, and though it's not 100% perfect, it's pretty cool. The problems aren't the fault of the guys who did it, they're the fault of previous owners- the house had carpet in the living room and halls at some point, so the tack strips (the things that hold the carpet in place at the edges of the floor) made some nasty divits in the concrete, and though they could fill them, they couldn't really polish them, so there are scads of little light gray marks. That said, it's still pretty neat, mostly super smooth and has lots of nifty patina. The foyer must have had tile, because those marks are a result of oxygen escaping through grout differently than the tile itself, but they don't bother me. It's really cold (and I don't own fuzzy slippers... make that any slippers), but I'm guessing that's gonna be a plus come summertime. Bonus points if you can spot Lester twice.
I'll probably spring for two matching Saarinen Tulip chair knock-offs. Haven't decided on cushion color yet because I'm still contemplating what color to paint the kitchen, but I'm leaning toward white with turqoise-hued glass tiles, and maybe some kind of blue accent wall (which would be the wall next to where all this mess will sit).


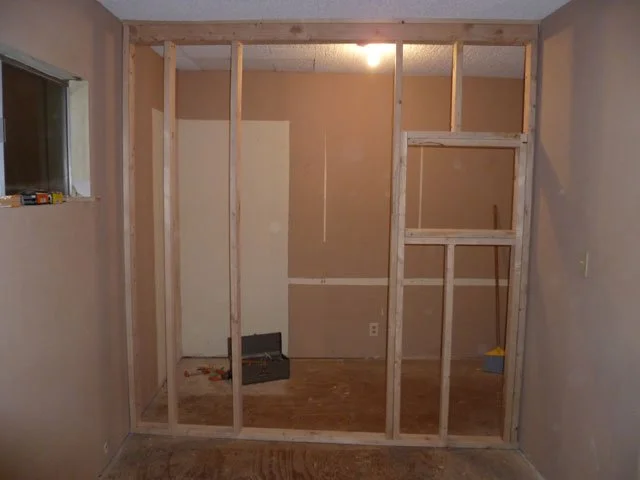
In the meantime, I've been hammering away (while, screwing really, but that kind of gives the wrong idea) at the wall framing for the studio soundbooth. This went relatively smooth, and I couldn't have done it without the help of my friend John who was there to tell me when I was being stupid. He also helped me set it in place, which is certainly not a one-man job. My original plan was to built it such that the top 2x4 would snugly rest against the ceiling tile, but I realized this was a bad plan, because the acoustic ceiling tiles are about 3/4" thick, and probably not very soundproof, so this would've likely defeated the purpose of trying to build a (relatively) soundproof booth. Instead, I drew thick pencil lines across the tiles with a straight edge, cut them with a utility knife and removed a "channel" of the tiles about six inches wide so that the frame could press up against the ceiling drywall instead. I had to make it wider than a 2x4 because the idea was to stand the semi-built frame up from the back, so we needed some clearance for the top to swing into place (hope that made sense). However, I cut the "extra" in the back side, so from the front, the drywall will butt up against the ceiling tiles and look nice. In reality we could've built the entire frame on the ground prior to swinging it up into place, but I was paranoid about getting the dimensions just right, so we just put together the top, bottom and sides then stood it up and screwed it into place. Luckily it went in just right and I built the rest with it standing up. The double-framed rectangle on the right will hold two panes of 1/4" glass (so angry female singers can flip me off when I'm riding them to do the 46th take because a note was out of tune even though I'm gonna fix it in the computer anyway). The pre-hung door will be immediately to the left of the window. It's only going to be 24" wide, but I'm still waiting for it to arrive, and I'd rather build the framing around it (so I don't mess up dimensions), thus all the door framing is currently missing. I'm also going to have to sawzall out the bottom 2x4 for the door, but we left it in because I wasn't exactly sure of the dimensions and we figured it'd be a lot harder to wrestle the frame in place with a big chunk missing. Shouldn't really matter too much if I nick the floorboards when I cut because the laminate wood floor will hide any damage. Hard to tell from the pic, but there's another three feet or so on the right side, so this is going to be a big vocal booth- really bigger than I need. But I intentionally put the door in the middle so that I could use the area on the left for storing guitar cases and stuff- irregular shaped objects are actually a plus because they act as random sound diffusers in a small space, theoretically, anyway (this is why you always see those weird wood panels with squares of differing heights on the back walls of audio mastering rooms). Anyway, the door should arrive pretty soon, then I have to do some insulation in the walls and hang the drywall, which should be relatively easy because it'll be all big new pieces (unlike the swiss-cheese patchwork nightmare of the kitchen), then it's paint 'n' flooring time. This should come together pretty easy- can't wait to get my studio out of the little bedroom and up where it belongs (that's a song pun there).
Architecture fer dummies
1/10/12

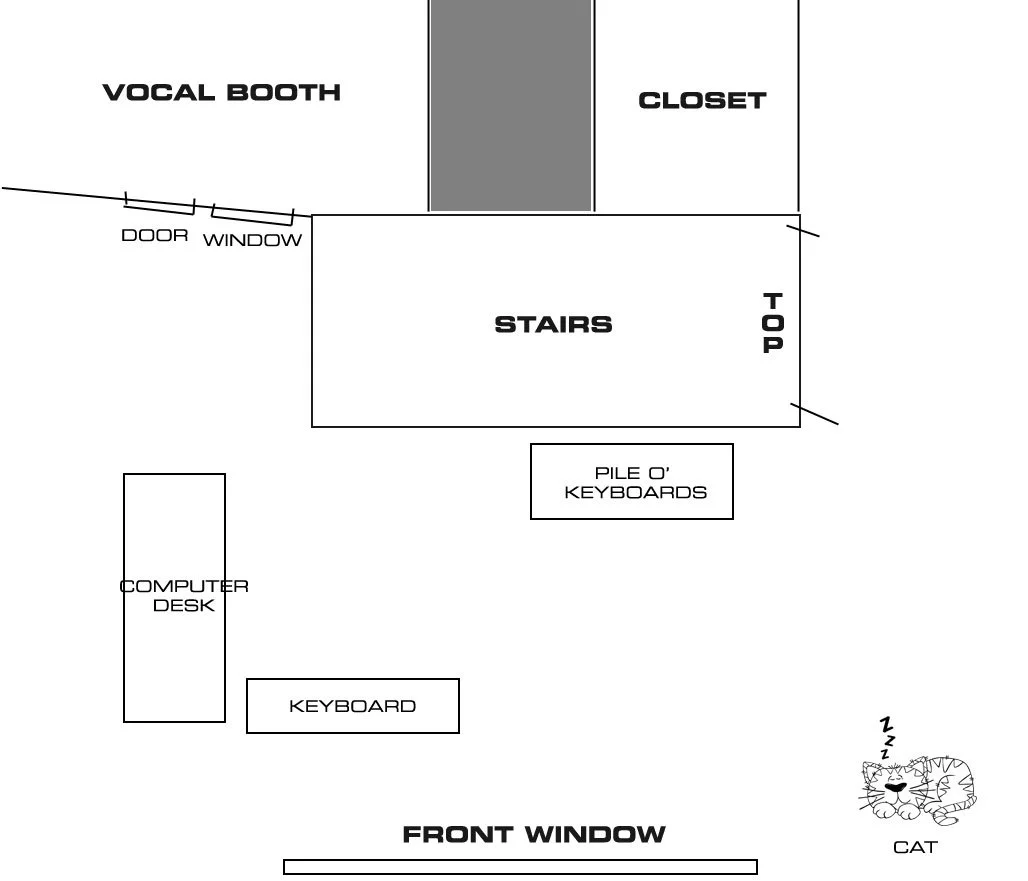
After getting frustrated trying to draw the wall for my studio vocal booth by hand (mainly because I don't have graph paper), I said screw it and cranked this out in Photoshop. I have no idea what real professional wall-drawers use, but I'm sure it ain't Photoshop. But that's what I'm good in, and I just used a 10 pixels = 1 inch scale. I would've done it "full scale", but Photoshop gets very sluggish with 96" wide images. This will all be 2x4 framing with the exception of the chunky 4x4 up top. My handyman advised doing this because I'm not going to attach it to the ceiling, reason being that the ceiling is drywall with glued-up 12"x12" 3/4" thick acoustic celing tiles. Since the wall is at a slight angle (and relatively parallel to the ceiling joists), the only way to create consistent spots to attach it would be to tear out the tiles/drywall and add 2x4 crossmembers between the joists, and I'm really not hip on tearing apart the ceiling. The tiles are probably a million years old and would be really difficult to match, so unless I redid the entire ceiling... well, you get the picture.
As a result, the wall will be attached at the bottom and sides only, which my handyman says should be fine for something this short. Though the door is going to be solid wood, thus kinda heavy, I doubt it'll be getting slammed, and I can't see anyone trying to break into my vocal booth, so it should be ok. Now I have to see if I have can source a pre-hung flat slab door locally with some kind of nice wood finish, which I'm dubious about. I already found great place online, and it was only around a $100, but the shipping tacked on another $75. I have a feeling I'm gonna end up doing that. The window will simply be two pieces of 1/4" glass (two will stop more sound) framed inside the 2x4's with simple wood mouldings (and foam rubber) holding them in place. I'm gonna wait 'til after the framing is built to get those just in case my dimensions aren't spot on.
Now I gotta go to Home Depot and check out the door inventory...
Musique concréte
1/9/12
Probably doesn't look much different than the other photos I've been posting, but today the concrete guys did the "second cut". It's very smooth to the touch, and the little tiny stones are becoming visible. This is usually considered a good thing, but it depends on your taste and a zillion physical factors of how they mixed and poured the original concrete (and keep in mind they weren't originally doing it with cosmetics in mind). I'm OK with some of little stones showing, but I'm glad it's not going to be so exaggerated that it looks like a granite countertop. The only thing that scares me a bit is that there's a fairly large number of various divits and damage, mostly from carpet tack strips in the hall, foyer, etc., but they tell me they can fix all that up. Good news is that they're telling me that the entire slab is very even overall, and I'm told if it isn't, it doesn't look as nice when it's shiny. Tomorrow or the next day they'll start using the grinding wheels that make it shiny, so perhaps that'll show up in the pics (otherwise you're all going to have to come visit me here. Kegger!). Lester seems happy about the whole deal, and between the floor improvements and successfully locating his tail, it's a swell day for being a cat.
In the meantime, yesterday I finished almost all of the screw-down-the-floor process in the upstairs studio, and it's a whole new world. I have to take a picture of the ten zillion nails I yanked out- my back wasn't feeling so good yesterday. However, on yet another trip to Lowe's to buy more drywall screws, I sprung for some ten-dollar kneepads, and those made a big difference (insert your own kneepad joke, and while you're at, feel free to make one about having a flat head for your beer and turning into a cheeseburger at midnite).
Scale almost correct.
Today I worked on the blueprint for the wall I'm gonna build up there to create a vocal booth. Initially I was going to build something small in the "nook" of the back corner of the room (the part to the left of the gray area, which is actually a little larger and squarer), but I decided to make it go all the way across for a couple reasons. 1) that whole area of the room is going to be kind of wasted anyway; the bulk of my setup will be in the big part of the room, and 2) any small room, especially one not much bigger than a phone booth is going to sound awful. I know the majority of people reading this aren't musician/engineer types so this is about to get either super boring or really interesting depending upon how much you like to don your Mr. Science hat...
Rooms tend to have two inherent sound traits- internal resonance (think of how sound rings in the shower) and reverb (think of a gymnasium). These are kind of the same thing, except that one takes far more time to propagate (and is typically more pleasant), but since our room is gonna be small, let's stick with our shower/resonation idea. When sound is contained in small spaces, for example, inside a saxophone, the shape and materials of the resonating chamber emphasize and de-emphasize certain frequencies. That's why a clarinet, though functioning almost identically to a saxa-ma-phone, sounds different. Now, let's take a singer, who has their own vibrating reed (their vocal cords) with its own unique resonating chamber (the throat/nose/mouth). Now, take our little tiny room square room with four hard walls, and that sound is gonna bounce around like nuts because the walls are so close. The sound is bouncing too quickly to be heard as an audible reverb (as in a gym), so instead it "rings" at certain frequencies... and dies at others (just like our aforementioned saxophone). Now, just as much as we don't want our saxophone to be playing inside a clarinet, we don't want our beautiful songbird singing in a crappy-sounding resonant chamber wherein certain notes will be super loud and others will die.
The best way to fight this is with a larger room where the effects aren't so drastic. The are a whole bunch of other ways too; acoustic sound absorbing foam works at higher frequencies, carpet, drapes, etc. But if you go nuts with those, your resonating problems go away, but your singer will sound (and feel) like they're singing into a pillow and in addition to recording crappy, it doesn't encourage spirited performances, so you have to strike a balance. Making the walls non-parallel helps too, and since I'm angling my wall, I'm doing that. There are some other acoustical tricks one can do (something called "bass trapping" for getting rid of the ringing at lower frequencies), but suffice to say, it's tricky business, and a bigger room in the first place is better. With all that in mind, I decided to go complete across the back of the of the room with one angled wall about 95" wide, plus it'll have the part all the way in the "crook" which will add roughly another three feet. So, it'll be somewhat narrow (about four feet down to about three feet on the other end), but at least it won't be teeny tiny, and I only have to build one wall this way.
I've never framed a wall before, so that'll be a new one on me- reading up on that fun now. It's gonna have a solid-core door and a window with two panes of glass, so I have to frame those too. I'm going to use a pre-hung door (i.e. includes jamb and hinges) because mounting a door and having it close and swing properly is harder than it seems.
None of this is really a recipe for 100% super soundproofing, but unbeknownst to many, properly soundproofing a room is really difficult and expensive (the only thing that stops sound is mass and airtight seals everywhere), and I really don't need an insane amount of isolation in my already pretty quiet neighborhood. I just need enough so I can have a singer in there, have my speakers at moderate volume without sound bleeding into the mic and I can swivel my desk chair without worrying about recording it.
Floor boardom
1/6/12
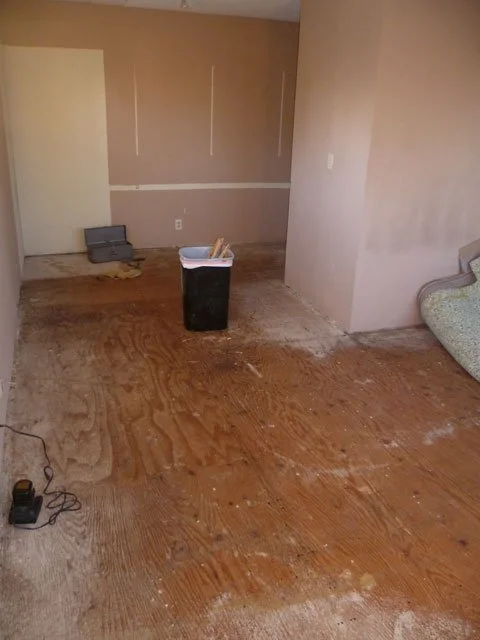
With the concrete polishing guys here doing their thing, the kitchen/living room area is off-limits as far as working in there, so I began futzing around with the over-the-garage add-on that will become my studio. As you may recall, the floor was frighteningly bouncy, the bulk of which was fixed by adding a giant reinforcement beam in the garage below. The room doesn't feel like you're going to fall through it anymore, but the floor was still a little squeaky and soft-feeling. Two reasons for this; the original owners cheaped out and used 1/2" plywood for the floorboards (3/4" would be more appropriate) and it's nailed to the joists instead of screwed. The inherent flex of the 1/2" ply makes the nail issue worse, because it tends to want to bend and pop up the nails, then it's more squeaks and bendy-ness than Charo.
So... I yanked up the carpet and padding, removed the tack strips and remembered the joy of removing tons of staples used to hold down the padding. They didn't even bother with the formality of baseboards up there, so that was a time saver (it'll have them when I'm done). I then set about screwing the floorboards down and removing the nails (to prevent future squeakage), and developed a procedure pretty quick: screw in drywall screw directly behind nail, nail then usually pops up a bit, then use two hammers, a big one and little one with the little hammer getting hammered under the nail by the big one, then yank nail. It's tedious work, because there's a LOT of nails, but I'm being very thorough because I intend to install a laminate wood floor, and I'd rather make the floor as tight and squeak-free as I can now. I'm close to half done, and though the floor isn't like walking on cement, it's still making a huge difference. Certainly a nice improvement over the flexible-flyer mess it was when I moved in... I can't believe people inhabited that room (and they did). As it stands, I ran out of drywall screws (hello Lowe's!), so I'm at a temporary standstill which is fine because my back hurts!
I also have to figure out what the hell to do with the carpet. The piece in back corner wasn't that big, and it's out, but the main room area is a large piece that I can't move on my own, and I'm not sure whether I should try and donate it (it's not in horrible shape), or cut it up and throw it away. I'm open to suggestions. Once I'm done securing the floor, I gotta figure what I'm doing about a vocal booth (and decide whether I'm going one at all). That area straight at the right rear of the photo is such a great location...
BTW, the downstairs concrete floor currently is about as smooth as the average basement; the entire "first cut" with 70 grit polishing wheels is complete. Monday they go to 100 grit, but he tells me it gets quicker each step.
Concrete Blog
1/4/12
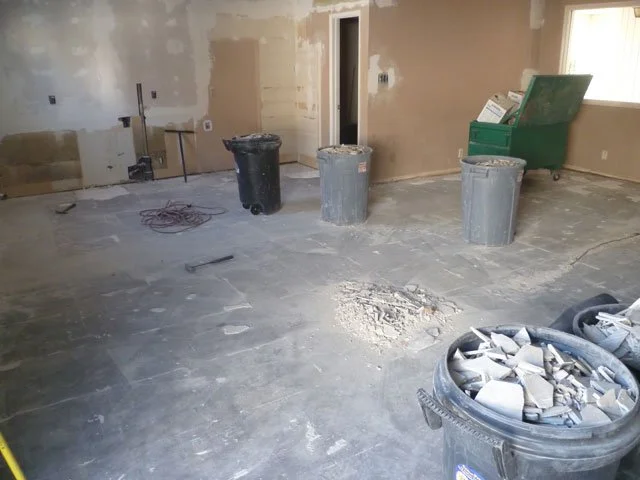
That may be my best horrible entry title pun yet. In case you were wondering what unpolished concrete looks like, that'd be something like this. The vast majority of tile and smooth set (i.e. grout) is removed and most of the resulting mess is in cans (or stacked in front of my house). Should be total comedy if anyone tries to steal the intact pieces, because not only are they welcome to it, they're ungodly heavy. Concrete Ken tells me my slab looks pretty good, which is good to know (incidentally, people are always telling me how good my slab looks). There's some cracks, but nothing they can't deal with. The only WTF thing is that somewhat inexplicably, they unearthed a 120v power line channeled into the slab (you can see it in on the top right) terminating in what appears to be a vertically piece of PVC pipe in the the middle of the floor (an illuminated umbrella? Stripper pole with built-in chaser lights? Anyone else have any guesses?). I have no idea what they were up to, but we gotta remove the wire (not too difficult) and they're gonna fill it in. They said they should be able to make it relatively invisible.
Total f^&*ng carnage
1/3/12

Limestone cowboys.
Gonna go out on a limb here and say that it may be too late to change my mind about keeping the travertine tile. And yes, it sounds as loud as it looks. Amazingly, Foofel the cat is sitting on the floor in my room snoozing as if nothing was out of the ordinary.