TL:DR version of Mid-Century Malaise blog… this blog documented the roughly decade-long renovation of my old house in Las Vegas. This previously lived on an older version of a Squarespace-hosted website. The only way to move the blog to the current Squarespace site is post-by-post, which is super tedious, so this will slowly be updated…
Wallpaper, schmallpaper
11/21/11

One of the many charming details of this place is that the previous owners loved them some textured wallpaper, and you can guess how I feel about wallpaper (unless it's some kind of really cool vintage op-art madness). Adding insult to textured injury, the genuises who last painted the entire joint painted right over it, because, hey, any job worth doing is worth doing wrong, right? God forbid you should deny the next owner the pleasure of Undoing The Stupid™.
Actually, the paint may have helped my cause because removal is matter of grabbing a corner and ripping it off the walls with your hands- it's so thick, it just comes right off, no tools necessary. That's the good news. The bad news is that it leaves behind all matter of backing/glue blechery. I was really worried that it would mess up the drywall so much that I'd have to replace it- I'll pass, thanks! But a little online research suggested simply mixing dish detergent and hot water in a bucket and saturating the residue gunk. You let it sit for a couple of minutes while the detergent breaks down the glue, and after that most of it comes off really easily. Much of it is removable by hand, and the rest I removed with a brillo sponge and a plastic paint scraper. Later on you go back with the soapy brillo sponge to get any remaining residue- it takes a little elbow grease, but it could be FAR worse. Only other thing to be aware of is that you have to turn the power off if you're anywhere near switches and outlets (I wasn't), because I'm pretty sure water and 120v AC don't mix (actually they do, therein lies the problem).
As you can see above, that lime green mess is the roughly four-foot chunk of wall I attacked, and though it looks ugly in the pic, it's actually pretty clean. I'm confident that a coat of Killz primer and it'll take paint fine. I suspect that the prior paint worked to my advantage, because you have to get the wall REALLY soapy and wet. Not sure how well the drywall would've held up had it not been painted. By the way, it is a somewhat messy process, and smells a little gluey. If you've ever done paper mache, you're in the ballpark (perhaps I could get a frame of a pig and make a pinata for all the children that don't live in my 'hood). Lucky for me, I don't care about the floor or the baseboards, because they're all going away.
BTW, the mess immediately to the right is where I tore out ceramic tile, and that'll definitely need to be re-drywalled, because it's impossible to get the smooth set off without destroying the wall (as I pretty much did).
Another break in the wall, pt. 2
11/21/11
I think the picture says it all. My good friend Maui came by the other day and checked my place out. He pointed out that getting that wall down without a sawzall was going to be a really really difficult... for those of you who don't what a sawzall is, that's a generic name for those recripocating saws with a blade that protrudes about 8". Good for cutting around corners, through 2x4's and most importantly in our case, through a bunch of nails hammered in at weird angles where we couldn't get at the heads. I was on the fence about dropping cash for a sawzall and Maui suggested I go by one of the (plentiful) pawn shops around here to again capitalize on someone else's misfortune (I saw a guy trying to a pawn an electic weed whacker at one of them). Well, third place I went, I happened upon this lovely Milwaukee sawzall, marked 50% off- $25! Six dollars worth of blades at the local Lowe's and I was in bidness.

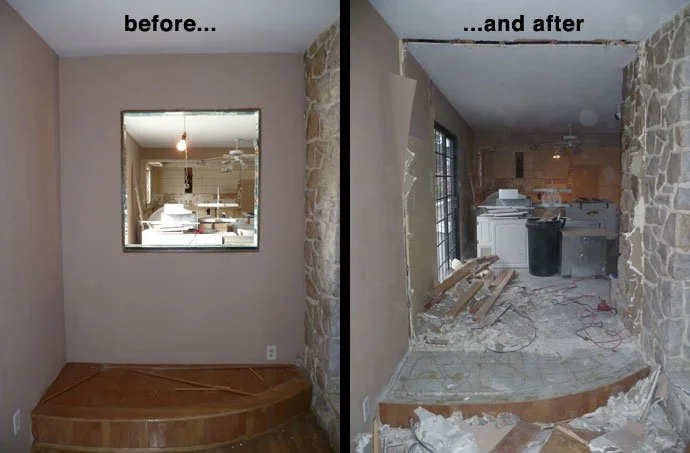
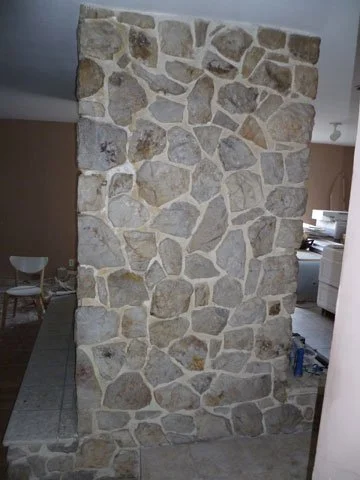
Anyway, god bless Mr. Maui for saving my ass again, because he's a little more experienced than I at these things and was a tremendous help. The framing for the previously-there glass case (of emotion) was shockingly overbuilt, thus really hard to get apart. Lots of doubled-up 2x4's and even a 4x4 beam across the top. Thanks guys. The biggest suprise was that it appears the wall was always there. I thought the wall was an add-on, but the giveaway is that the rocks for the fireplace stop and there's a space in between:

To put it in perspective, this is the other side of the fireplace, i.e. next to the entry to the family room:
Ideally I'd want both sides to be "all rock" as it were, but that'd be difficult, so instead I'll just try and get some 5" wide trim pieces and go around the perimeter of the opening. By the way, whoever said demo work was messy was REALLY right. I didn't think it would be too bad since the wall is only six feet wide, but I was super wrong. It's a mess in there. Clean up on aisle seven...
In other really significant news. I ordered the new cabinets today from Ikea. That took some some cajones, because it pretty much means no more changes on the design. But I'm pretty confident I got it all right. Total was $1505.71+$350 to ship the whole mess from CA to here. I was afraid the shipping would be more, so I'm fine (MDF is really heavy). Should arrive in about two weeks.
$1500 is pleasantly cheap for cabinets, but keep in mind I only ordered the actual frames and drawers. All the doors, drawer fronts and exposed side panels are coming from Semihandmade Doors in CA. Think I mentioned them up here before- they're a cabinet place that makes custom doors specifically for Ikea frames. "Why didn't you just order all this crap from Ikea?", you say. Because I didn't really love any of the doors Ikea sells. I wanted very minimal, totally flush face doors with zero extra flourishes. In Ikea land, this means their Nexus model doors. For reasons I can't comprehend, they discontinued their medium brown color leaving only "brown-black"-too dark, or birch, which we all know so well from the ubiquitous Malm line of bedroom furniture. And I'll kill a motherf&*er before I bring one more piece of that damn Malm fake-birchiness into my realm. What I really wanted was medium/honey-colored mid-century-correct wood.
Fortunately I discovered Semihandmade on an Ikea forum. Their concept is to make beatiful kitchen doors by laminating really nice thin wood onto MDF doors-pretty much what Ikea does, but I don't think Ikea uses real wood. It's a little more money than Ikea, but not that much.The idea is that you get a fancy pants custom-looking kitchen for a fraction of the cost of a real custom kitchen. Right now I'm on the fence between their teak (lovely honey-tinted color) or mahogany (slightly more brown, less $$$), so I'm gonna get quotes and see. The nice thing is that I can send them the file for my 3D Ikea online kitchen designer thing and they just use that as a guide.
The Manny machine
11/17/11

The other day I noticed my neighbor's palm trees were looking extra spiffy, as evidenced by a big, neatly tied off pile of trimmings on the sidelwalk in front of his house.
Apparently having noticed that my landscaping was looking something like one of those alien planets on Lost In Space, I asked him about it, to which he replied (redneck accent), "I was gonna mention that to you... my daughter's boyfriend is a handyman and he does it for us. He's Mexican, but he's a real good guy." (Nice! My neighbor is more of a racist than I am, because he wasn't trying to be ironic). "He's a real nice guy, I bet he'd do yours for $75 or so... I'll send him by."
So yesterday, Manny-the-Mex...landscaper, came over and did a stupendously good job of trimming my palm trees (I have about six of them, one is huge, the others are real small). Took him HOURS. I didn't have change for $75, so I gave him $80. I should've given him more. 'Til now I thought my entire landscaping situation needed to be reconfigured, but just trimming the mess made a world of difference. Between my car (which may as well be a Lamborghini in this area) and my nice new landscape, my neighbors must love me. Anyway, I took this opportunity to snap some outdoor "beauty" shots. The rose and whatever-else-those-are bushes are largely dead and I'm told you need to wait to hack off the dead parts, but that whole area smells amazing right now. I'll see what it takes to fully resuscitate them.
I think if I just swapped out the rocks in the front bed for something less sun-faded, it would look real nice. There are lights all over too, and most are on their side with wires all over. Some work, some don't, and they're ugly as sin (of course). That's another project- maybe some green and blue ones? That'd be sexy. There's also some kind of sprinkler system action in there too, which doesn't work. It never ends.


Four days and no new entries?!? C’mon!
11/14/11
Things have been slow-ish at Casa Mitch destruction central. Here's why:
Remember that plumbing leak I talked about when I removed the dishwasher? That turned out to be a pretty epic pain in the ass. It had a standard "angle stop", i.e. one of those little oval-handled faucet-like valves. Usually you can just shut 'em off, disconnect water lines, and everyone's happy. This is how it worked with the hot and cold water lines for the sink. But once I got the water line for the dishwasher removed, it kept dripping, and no amount of tightening was gonna stop it. Off to Lowe's I went to get a cap to screw on in place of the valve. Since the there was already a threaded bolt on the pipe end, I needed two parts, a dual-threaded coupler and the actual cap.
I called my Nice Plumber Guy (guys who installed the gas lines), and he told me where the master water shutoff for the house was- under a metal cover near the sidewalk. Opening this, I apparently disturbed a large festoon of baby crickets (and some not-so-baby). Sorry guys. Fortunately I was wearing gloves. This began what would be an afternoon of running back and forth, screwing some combination of stuff on, turning water back on, then watching it continue to drip while I tightened, tried it with and without plumbing tape, etc. Then I took a trip to a dedicated plumbing store where they informed me that the threads were of crap tolerance, thus impairing their ability to impede water flow. They sold me some more cap-type stuff. Back home I went. Master water off. Same thing. Drip. Drip.
Call Nice Plumber Guys™, they tell me to get an angle stop instead (i.e. the valve that was already there). By this time, it's dark, I'm totally frustrated and I'm supposed to go see my friend Richard Cheese that night, so I shove a bowl underneath, and skulk away, defeated.
To cut a long story short, much imbibing occurred Friday night, landing me with a wicked hangover Saturday, which morphed into one of my world-famous multi-day muscular tension headaches (imagine a migraine with slightly different symptoms, but equally painful and debilitating). This lasted 'til about late Sunday afternoon when I finally got it together to return to Lowe's, and swap out their crappy cap stuff for a new angle shutoff valve (and a roll of better quality plumber's tape). Returning home, I shut off the water for the what seemed like the 100th time, tightened the new valve, turned on the master water and crossed my fingers. God bless it, it no longer leaked. Victory.
As an aside, while at Lowe's, I picked up more of my favorite new light bulb. Sylvania makes some neat CFL fluorescents that are 60-watt equivalent, but only use 13 watts, and somehow have a "light temperature" like a standard bulb. In other words, they don't give off cold, blue-ish light. They're about six bucks for two, turn on instantly, and are more compact than older CFL's. Neat-o. I don't think they work with dimmers though.
Back to today (Monday), I dicked about in Ikea kitchen designer app some more trying to decide what to do about the tops of the cabs and the part of the ceilng that drops down about a foot around the perimeter of the kitchen. Sounds simple, but it rapidly gets complicated... for starters my swell built-in cab depth fridge is to be surrounded by cabs, and the whole mess is 24" deep. This is will all go either up to the ceiling, or about 10" from the ceiling depending on how I do it.
But high cabs aren't typically that deep- they're usually 12 7/8" deep. See how this gets tricky? If I don't remove the "drop" from the ceiling, its depth isn't gonna match the cabinet depth in places. And it's gets worse because my current design has shallow cabs on the wall by the window, but all the way at the left I have another tall 24" deep cab for the built-in oven and microwave. Sigh.
Ikea basically has two wall cabinet heights- 30" and 39". It would appear the shorter ones are for situations with a ceiling drop, and the tall ones are for situations where you want to go clear up to the ceiling (or real close, with a trim piece on top). This may be what I do.
This is all getting complicated :(
Almost there!
11/10/11

I've been slacking on posts, but the kitchen is almost totally "destructinated". Ripped out all the ceramic tile Tues, which was a total loud, tedious mess (you can see the remnants of where it was all across the walls). Fortunately, garbage was the next day, so I filled two heavy garabage cans full of ugly pale pink ceramic tile. I also completely destroyed an innocent metal paint scraper in the process with a hammer. I suspect you're supposed to use a more stout chisel-type tool, but I didn't have one handy. The drywall obviously took a beating, so much of that will get replaced.
Next thing was disconnecting plumbing and removing the garbage disposal. This was far easier than I expected, but stiiiiinky. Couldn't figure out how the disposal was attached to the bottom of the sink, then I saw some kind of slidey looking mount that apparently twisted somehow. "Gee, let me try tapping that with a big screwdriver and hammer..." KA-KLUNK! Hmmm, hope I didn't break it. Kinda wanted to recycle it in the the new sink :)
With everything detached from the sink and all caulking severed, I realized the double sink weighed a zillion pounds (I'd guess in the 70-90 lb range) and there was no way me and my puny muscles (and currently irritated back) were getting it out. Fortunately my good friend John came by and heaved it out last night. Today I brute forced the countertops off, which is a good and violent process- you pry 'em up, then jostle them free, followed by pulling the whole mess onto the floor, and breaking it up a bit with shiny new 4 lb sledge. Laminated countertops are super heavy too, in case you were wondering. Got those out to the side of the house where hopefully they'll... evaporate. I suspect I'm gonna have to get one of those super driveway dumpster things sooner or later, or the garbage men are probably going to Molotov cocktail my house.
Just pulled out the dishwasher, which was easy. Standard 110v plug into the wall, turn off water supply from wall and unscrew, then pull out the drain hose... and splatter water from the hose all over the room and side of your head. Crap! I guess that's a relatively benign casualty given the scope of this mess. Rest of the cabs should be pretty easy to remove. I'm getting pretty good at it!
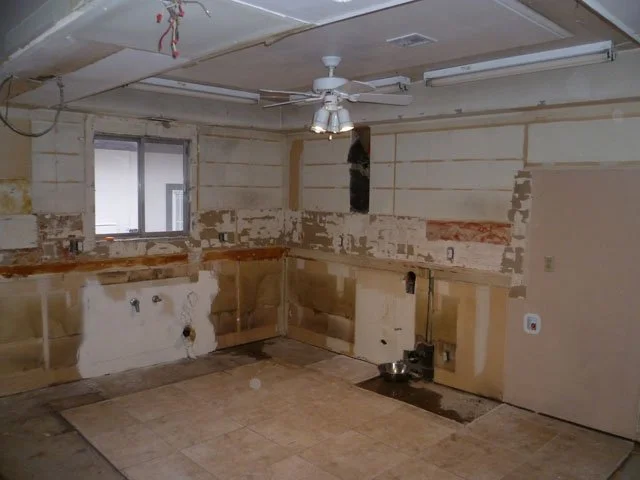
That's more like it. All gone. I'm currently getting a little drip-drip leak out of the water valve for the dishwasher (the puddle is from when it splashed the contents of the line). I think the bowl will hold it for the night, but tomorrow I'm gonna need to go to Lowe's and get a cap to replace the valve. I don't even know where the water shuts off here! I hate doing plumbing, so hopefully it doesn't turn into a bad Three's Company/Honeymooners escapade.
Now I'm out of excuses- have to finalize my new cabinet plans and order them bitches up. Also need to figure out what the heck I'm gonna do with old cabinets. I made be able to donate them to the Vegas Habitat For Humanity, which would be good because they'll pick 'em up. Next major step is removing all the tile floors in prep for the polished concrete treatment, and that's going to be a little difficult with a kitchen's worth of cabinets all over the place. BTW, I'm having the concrete guy's assistant remove the tile. He offered to do it for a really fair price and he'll haul it away. I ain't proud!
The fake island
11/7/11
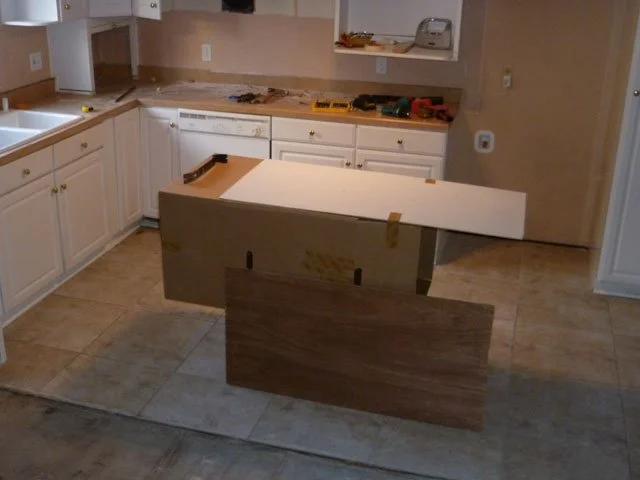
After much measuring, masking tape on the floor, and assembling fictional cabinet clusters in the Ikea Kitchen Designer online 3D thingee (which is kind of amazing, though a little wonky), I read online that it was smart to mock up your island with boxes to see how it would sit. It may seem silly, but it's an excellent idea. And having just moved in, I have no shortage of mint-condition Uline boxes. Fake island is a half-height wardrobe box on its side with another box under it, and a piece of white masonite appropriated from the demo of the existing cabs (after carefully yanking out a bunch of tiny nail brads that were destined to puncture my fingers).
It's actually a little smaller than the real deal will be. It's 60" long as the real thing will be, but real one will be 15" deeper- total depth will be 39". I'm putting the sink and the dishwasher in it, so it had to be wide enough for both. I had to make sure the galleys around it (i.e. walking areas) were wide enough, and this where having a real mockup really helps. I have three feet on the sink and back sides, and there's more than that on the right side. The mockup also verified that the dishwasher and fridge doors will have ample room to open.
The plumber tells me the water lines almost definitely run right under that area so "all" they have to do is make some big holes in the concrete for the water lines. Initially I thought I'd have to have some kind of channel in the concrete going back to the current sink location, but I won't, so that's nice; I'll be able to maintain the integrity of the floor. Not really sure how they're gonna get 120v in there for the dishwasher though. Maybe I'll just run a big orange extension cord across the floor. Yeah, that'll be classy.
----------------------------------------------------------
Below is my current design in the Ikea kitch designer program, though it's not really done. Haven't really done the cabs on the left yet (which will house built-in oven and microwave). And that white monolith is the refrigerator- they only have photo-realistic renderings for their own fridges, not my snobby Sub-Zero, so you just add a generic refrigerator and input the dimensions. Much of the battle is just figuring out all the correct cab sizes to choose so that everything fits in the allotted space correctly and cooperates with the dimensions of the appliances. For example, I had to use a pretty wide cabinet underneath the hood so that I could fit a 32" wide cooktop into the top. Then I had to figure out what I could wedge on either side...
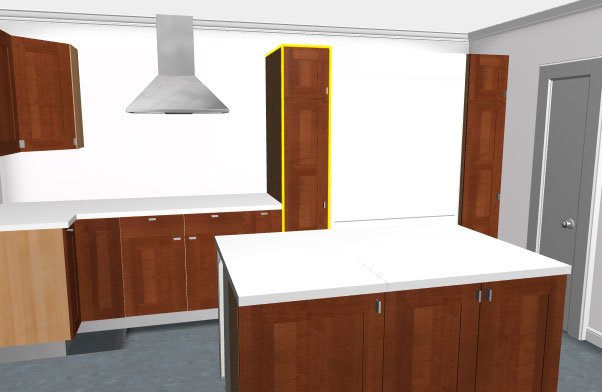
Cosmetically I'm not sure I want cabinet doors on the out-facing side of the island; not sure what to do about that. The cabs on the the front-facing side are only 15" deep anyway. Also, there will be a cooktop under the hood; there's no option to show that in the modeling program. Same for the sink in the island. Pretend they're there. Finally, I have to decide how to handle the tops of the wall cabs. As it stands, the ceiling drops about a foot a all around the perimeter of the kitchen area, and I'm gonna rip that out so the ceiling is all one height thoroughout the entire room- more of my "open space" plan there. Maybe I'll do some wood pieces? Not sure.
Slightly-more-open floor plan
11/6/11

Just knocked out some more of the cabinets. Luckily I didn't find any dead bodies (I did find a dead cockroach the other night though. You have to be semi-immune to that kind of thing when doing this stuff). Of course I made a big mess- this is post-shop vac pic.
It's really more critical that I finish the cabinet design so I can order the frames from Ikea, and that was kind of why I whacked out the last of the "jutting out section"- so I can get a better idea of where the island's gonna sit, and how physically large it should be. I have little pieces of masking tape all over the place (like Les Nessman's imaginary office walls), but I read that it's a good idea to use three-dimensional objects, and I just happen to have to some waist-high wardrobe boxes that should make an excellent approximation.
Next up is gonna be the cabs with the sink, which will entail removing the sink, which is gonna be a b-i-itch. It has a massive garbage disposal (with fun hard wired electrical... bzzt), and lots of plumbing to undo. And the sink probably weights a metric-ton. It's about to get rich...
I must be doing something right
11/6/11
ecause I found this diagram on some kitchen design site displaying pretty much exactly what I intend to do. Except that my refrigerator will proportionally be about three times the one rendered here. Anyway, it properly represents the classic "kitchen work triangle" concept (not to be confused with the "upside-down pink triangle," which will likely never see the inside of my kitchen).
Gonna skew the sink to the left (it'd be to the right in this pic, but it's technically upside down), then have the dishwaster beneath, to the right side of the island. Currently trying to figure out which Ikea cabinets you combine to achieve this. Their "built-in" islands are really just combinations of cabs, and none of them are wider than 24". Pretty sure my sink will be wider than that (the current ugly one by the wall is around 31"), so I think I may be flying by the seat of my pants here.
I know all there is to know about the drying game
11/6/11
Actually that's untrue. Seems I know very little.
Last week I bought me a washer/dryer pair off the local Craigslist. I couldn't use the dryer due to aforementioned lack of gas lines- the laundry room had a 220v outlet for an electric dryer. Soooo... yesterday with my happy newly-installed gas line to the dryer, I did a ton of laundry. I was foiled because the dryer doesn't get hot, at all. This is odd because plumber guy tried it out and it seemed to work when they left (I stuck my own paw in to feel ze heat). Today I will be going to the local laundro-rama and drying clothes while I eat breakfast and hope the derelicts of Vegas don't steal my clothes and Helena-Bonham-Carter-in-Fight-Club-ize my socks and underthingees.
Probably only two possibilities: the igniter is broken in the dryer (that which makes the gas initially combust), or the gas itself is off. I can test this by sticking my mouth over one of the inlet lines, or more safely, by turning on the central heat in the house. I have a feeling it's the dryer, in which case I'll dig up the number of the guy who sold it to me (who's kind of a broker of this stuff), and listen to him politely tell me to go blow.
Update on Sunday, November 6, 2011
After futzing with the start knob, I realized that the ignitor is intermittent (my dad's favorite word). Haven't figured out the secret to making it go consistently, but if you mess with it, you eventually hear the "FWWWPPP" sound of the flame starting. So that's sort of fixed for now.
Update on Sunday, November 27, 2011
In case anyone is bothering to read my old entries, the dryer stopped heating altogether soon after, and it dawned on me that I have a Home Warranty (!) with the house. So I called those guys, and for a mere $55 flat rate claim, they fixed the dryer. The coils that somehow turn the igniter on and off to maintain heat were bad. Which I actually determined on my own from watching a dryer repair vid on YouTube. But I couldn't figure out how to get the dryer apart, and it seemed like getting the parts was gonna be a pain anyway. Fine with me, as I suspect the parts would've cost $20-30 anyway.
A glass cage of emotion!!!
11/5/11

About 60% disassembled here….
This hot mess of interiorial beauty must have been some magical window of knick-hackery and curio curiosities. This could beautifly display my collection of tiny porcelain hand-painted yip dogs, or steppin' it up a bit, my stash of Swarovski crystal cherubs, octopii, and vaguely suggestive large-horned unicorns. Since I don't have any of that crap (and wouldn't be caught dead with the kind of woman who would), away it goes, along with the wall it rode in on (in?). This will further impart the large, open-floor plan wonderfulness I'm going for, and perhaps extend the already impressive echo in the room to a full four-second decay time. I'm all about the RT60, yo.
Now, this thing was a whole lotta glass- sliding doors on the front and full piece of glass on the back, plus all the shelves- so going nuts with a hammer seemed like a decision I'd soon regret (and feel real dumb in the ER explaining to Dr. David De-glass). Instead, I donned heavy gloves and my sleek new CSI Abby-approved safety glasses and took the scientific approach. Hoping to pull the entire thing out as one unit, I pried off all the moldings (which did nothing, structurally) and tried to cut the silicon glue that seemed to hold it into the wall, but nothing would budge, and I couldn't start brute forcing it for obvious reasons.
Instead, I took the doors off and slooooowwwly pried off the big piece of back glass (visible on the floor), and gently set that guy down (heavy, it was). I then figured out that all the little shelves were silicon glued together, and that I could scrape off the glue with a metal putty scraper and a utility knife... carefully. I disassembled the entire thing that way and gently set the pieces into a big garbage can. Besides a couple small side splinters, I broke no glass at all- yay!
When I was done, all I had left were the little mirrors along the inside perimeter which I'm not too afraid of smashing when I go sledgehammer crazy on the entire wall soon...

With that out of the way, I decided to start hacking at the wall to see how tough that was gonna be. Since I don't yet have a serious sledgehammer, I took my Big Scary Prybar and hammered it into the wall, then took a standard hammer and smashed away at a piece of wood (otherwise the hammer makes wee holes). The wall is plaster (update: it’s regular drywall), so it's pretty tough, and will need some serious force (I was also going easy because there's power in there, and I hadn't turned off the breakers). Interestingly, there was some newspaper shoved in the wall, and the jaundiced page of The Las Vegas Review Journal showed May 17th, 1981. At least now I know for sure that the wall was an addition and its removal won't cause certain structural calamity.
BTW, yesterday the nice gas guys removed the metal gas line that clumsily dropped from the ceiling, thus making the fireplaces into glorified oven burners. Yuck. You can see where it used to be right next to the fireplace where the paint is missing (of course they didn't miss painting the gas pipe). Hopefully nothing will stop me from opening the flues and making lovely raging Duraflame fires for my floozy future guests.
Honestly I'm not even sure how to take down the wall. I know you're supposed to sledgehammer away, but it would seem that the 2x4 framing would be pretty tough to break that way. I imagine I'll sledge as much plaster out as I can and take my 7 1/4" circular saw to the 2x4's. I also imagine I shall feel very manly on that day.