And goodbye to grandma’s cabinet
11/27/11
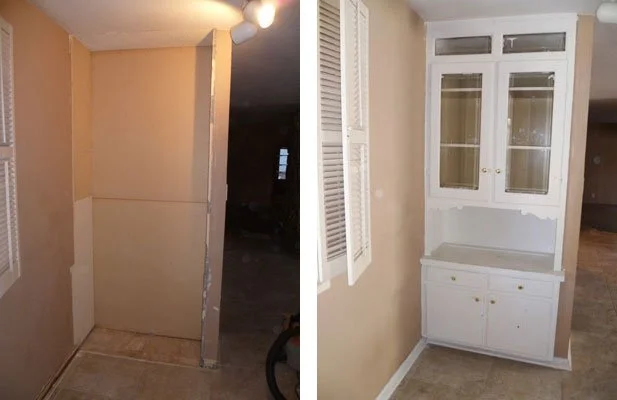
I don't even know what you'd properly call this old-fashioned built-in, but it was adding an authentic taste of 1936 to my 1963 home, so it had to go. In addition to looking an antique, it had been sloppily painted with the artisan-quality workmanship.
Unlucky for me, the build quality was the opposite- it was easily the most difficult demo job yet. Whoever built it was really hellbent on severely frustrating whoever un-built it in the future, so nice work there pal. I started by removing the doors. Of course the screws holding the hinges on were slathered in paint, so I had to use a pokey tool to get that out. Since there weren't really any exposed nails or screws, it was mostly a lot of violent smashing it apart with sister sledgehammer. Whatever finesse and studiousness I discussed in previous posts went right out the window.
The trickiest part were the boards on the bottom, sides, back and ceiling. On either side was a brawny 3/4" plywood piece running the length of the wall. The sides were not only nailed in a way where it was almost impossible to get to the heads, they were very tightly wedged between the board on ceiling and a board on the bottom (itself on a 2x4 frame). Let's just say there was a LOT of bashing at 'em with the sledge, getting tired, swearing, scratching my head, walking away to ponder it a while... finally got the side pieces out though. There was also a thin board (I initially assumed it was thicker) all the way up the back wall. Because it ran floor-to-ceiling and all the way side-to-side, there was no way to get anything in to pry it. In desperation, I routed a notch about two inches wide with my Dremel rotary tool, and was able to shove my pry bar in. At the point I figured out the board was only about a quarter-inch thick, and it was easy to yank out (albeit a little unwieldy to remove due to its size). Only messed up the dryway behind a little...
You can't see in the pic, but I did do some minor wall and edge damage getting it all apart, but I hope my drywall wiz friend Myke can compound these back to beauty. As previously mentioned, I can't think of anything else sensible to do here except more shelves* (I'm open to suggestions, FB friends). Also, since I'm in love with the wood-clad walls I see in a lot of fancy mid-century modern homes (hi Lisa), I'm thinking it might be really neat to clad the inside walls of this (and the old dry bar in the last entry) with some pretty stained or poly-coated wood, then add the shelves. This would have the additional benefit of reducing the amount of dryway-booboo-fixery to almost nothing.
By the way, the reason I'm going nuts with the demo stuff now is because the tile floor removal/polished concrete guys are landing very soon, and ALL of these areas will be getting the polished concrete treatment, provided they don't discover any deal-breaking flaws upon tile removal. The only remaining destructo stuff is removing the soffits that encircle the kitchen area (this will be a big pain in the ass job), and removing all the baseboard and quarter-round trim (a super easy job). Technically I don't need to remove the soffits before the floor gets done, but I'd rather all that crap fall from the ceiling and hit the tile floor that's getting torn out instead of marring the newly-polished floor. (Incidentally, I have just come up with most genius blog entry title pun, so now I HAVE to get crackin' on the soffit removal job)
*Actually that's not true. If I was insanely rich, I would get some really thick glass and make it a giant floor-to-ceiling tropical aquarium. How amazingly cool would that be? Unfortunately, it ain't in the budget, and besides, the only thing I know about fish (besides the fact they look neat under black light) is that I enjoy eating them in the form of spicy tuna roll with lots of wasabi. Yum.