SEARCH
Mid-Century Malaise – "SHOW ME PICS" Version

Monday
Nov072011

the fake island

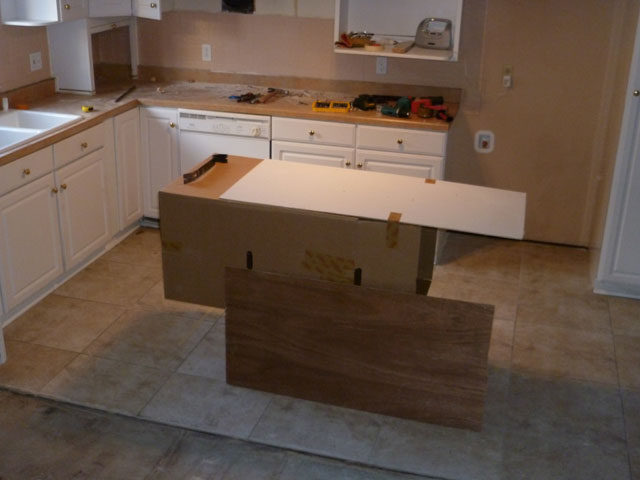
After much measuring, masking tape on the floor, and assembling fictional cabinet clusters in the Ikea Kitchen Designer online 3D thingee (which is kind of amazing, though a little wonky), I read online that it was smart to mock up your island with boxes to see how it would sit. It may seem silly, but it's an excellent idea. And having just moved in, I have no shortage of mint-condition Uline boxes. Fake island is a half-height wardrobe box on its side with another box under it, and a piece of white masonite appropriated from the demo of the existing cabs (after carefully yanking out a bunch of tiny nail brads that were destined to puncture my fingers).

It's actually a little smaller than the real deal will be. It's 60" long as the real thing will be, but real one will be 15" deeper- total depth will be 39". I'm putting the sink and the dishwasher in it, so it had to be wide enough for both. I had to make sure the galleys around it (i.e. walking areas) were wide enough, and this where having a real mockup really helps. I have three feet on the sink and back sides, and there's more than that on the right side. The mockup also verified that the dishwasher and fridge doors will have ample room to open.

The plumber tells me the water lines almost definitely run right under that area so "all" they have to do is make some big holes in the concrete for the water lines. Initially I thought I'd have to have some kind of channel in the concrete going back to the current sink location, but I won't, so that's nice; I'll be able to maintain the integrity of the floor. Not really sure how they're gonna get 120v in there for the dishwasher though. Maybe I'll just run a big orange extension cord across the floor. Yeah, that'll be classy.
----------------------------------------------------------
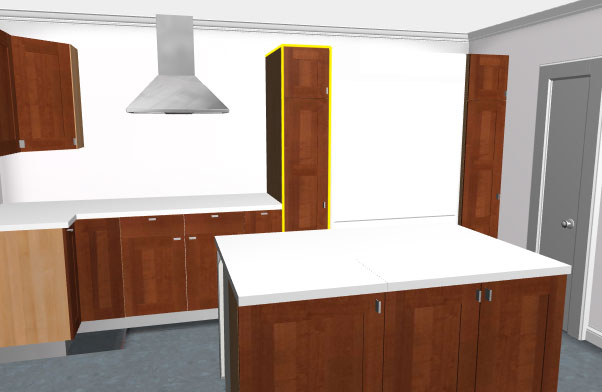
Below is my current design in the Ikea kitch designer program, though it's not really done. Haven't really done the cabs on the left yet (which will house built-in oven and microwave). And that white monolith is the refrigerator- they only have photo-realistic renderings for their own fridges, not my snobby Sub-Zero, so you just add a generic refrigerator and input the dimensions. Much of the battle is just figuring out all the correct cab sizes to choose so that everything fits in the allotted space correctly and cooperates with the dimensions of the appliances. For example, I had to use a pretty wide cabinet underneath the hood so that I could fit a 32" wide cooktop into the top. Then I had to figure out what I could wedge on either side...

Cosmetically I'm not sure I want cabinet doors on the out-facing side of the island; not sure what to do about that. The cabs on the the front-facing side are only 15" deep anyway. Also, there will be a cooktop under the hood; there's no option to show that in the modeling program. Same for the sink in the island. Pretend they're there. Finally, I have to decide how to handle the tops of the wall cabs. As it stands, the ceiling drops about a foot a all around the perimeter of the kitchen area, and I'm gonna rip that out so the ceiling is all one height thoroughout the entire room- more of my "open space" plan there. Maybe I'll do some wood pieces? Not sure.

Sunday
Nov062011

slightly-more-open floor plan.

Just knocked out some more of the cabinets. Luckily I didn't find any dead bodies (I did find a dead cockroach the other night though. You have to be semi-immune to that kind of thing when doing this stuff). Of course I made a big mess- this is post-shop vac pic.

It's really more critical that I finish the cabinet design so I can order the frames from Ikea, and that was kind of why I whacked out the last of the "jutting out section"- so I can get a better idea of where the island's gonna sit, and how physically large it should be. I have little pieces of masking tape all over the place (like Les Nessman's imaginary office walls), but I read that it's a good idea to use three-dimensional objects, and I just happen to have to some waist-high wardrobe boxes that should make an excellent approximation.

Next up is gonna be the cabs with the sink, which will entail removing the sink, which is gonna be a b-i-itch. It has a massive garbage disposal (with fun hard wired electrical... bzzt), and lots of plumbing to undo. And the sink probably weights a metric-ton. It's about to get rich...

Sunday
Nov062011

I must be doing something right.

Because I found this diagram on some kitchen design site displaying pretty much exactly what I intend to do. Except that my refrigerator will proportionally be about three times the one rendered here. Anyway, it properly represents the classic "kitchen work triangle" concept (not to be confused with the "upside-down pink triangle", which will likely never see the inside of my kitchen). 

Gonna skew the sink to the left (it'd be to the right in this pic, but it's technically upside down), then have the dishwaster beneath, to the right side of the island. Currently trying to figure out which Ikea cabinets you combine to achieve this. Their "built-in" islands are really just combinations of cabs, and none of them are wider than 24". Pretty sure my sink will be wider than that (the current ugly one by the wall is around 31"), so I think I may be flying by the seat of my pants here.

Sunday
Nov062011

I know all there is to know about the drying game.

Actually that's untrue. Seems I know very little.

Last week I bought me a washer/dryer pair off the local Craigslist. I couldn't use the dryer due to aforementioned lack of gas lines- the laundry room had a 220v outlet for an electric dryer. Soooo... yesterday with my happy newly-installed gas line to the dryer, I did a ton of laundry. I was foiled because the dryer doesn't get hot, at all. This is odd because plumber guy tried it out and it seemed to work when they left (I stuck my own paw in to feel ze heat). Today I will be going to the local laundro-rama and drying clothes while I eat breakfast and hope the derelicts of Vegas don't steal my clothes and Helena-Bonham-Carter-in-Fight-Club-ize my socks and underthingees.

Probably only two possibilities: the igniter is broken in the dryer (that which makes the gas initially combust), or the gas itself is off. I can test this by sticking my mouth over one of the inlet lines, or more safely, by turning on the central heat in the house. I have a feeling it's the dryer, in which case I'll dig up the number of the guy who sold it to me (who's kind of a broker of this stuff), and listen to him politely tell me to go blow.

Saturday
Nov052011

a glass cage of emotion!!@#@!!!!!

About 60% disassembled here... This hot mess of interiorial beauty must have been some magical window of knick-hackery and curio curiosities. This could beautifly display my collection of tiny porcelain hand-painted yip dogs, or steppin' it up a bit, my stash of Swarovski crystal cherubs, octopii, and vaguely suggestive large-horned unicorns. Since I don't have any of that crap (and wouldn't be caught dead with the kind of woman who would), away it goes, along with the wall it rode in on (in?). This will further impart the large, open-floor plan wonderfulness I'm going for, and perhaps extend the already impressive echo in the room to a full four-second decay time. I'm all about the RT60, yo.

Now, this thing was a whole lotta glass- sliding doors on the front and full piece of glass on the back, plus all the shelves- so going nuts with a hammer seemed like a decision I'd soon regret (and feel real dumb in the ER explaining to Dr. David De-glass). Instead, I donned heavy gloves and my sleek new CSI Abby-approved safety glasses and took the scientific approach. Hoping to pull the entire thing out as one unit, I pried off all the moldings (which did nothing, structurally) and tried to cut the silicon glue that seemed to hold it into the wall, but nothing would budge, and I couldn't start brute forcing it for obvious reasons.

Instead, I took the doors off and slooooowwwly pried off the big piece of back glass (visible on the floor), and gently set that guy down (heavy, it was). I then figured out that all the little shelves were silicon glued together, and that I could scrape off the glue with a metal putty scraper and a utility knife... carefully. I disassembled the entire thing that way and gently set the pieces into a big garbage can. Besides a couple small side splinters, I broke no glass at all- yay!

When I was done, all I had left were the little mirrors along the inside perimeter which I'm not too afraid of smashing when I go sledgehammer crazy on the entire wall soon...

With that out of the way, I decided to start hacking at the wall to see how tough that was gonna be. Since I don't yet have a serious sledgehammer, I took my Big Scary Prybar and hammered it into the wall, then took a standard hammer and smashed away at a piece of wood (otherwise the hammer makes wee holes). The wall is plaster, so it's pretty tough, and will need some serious force (I was also going easy because there's power in there, and I hadn't turned off the breakers). Interestingly, there was some newspaper shoved in the wall, and the jaundiced page of The Las Vegas Review Journal showed May 17th, 1981. At least now I know for sure that the wall was an addition and its removal won't cause certain structural calamity.

BTW, yesterday the nice gas guys removed the metal gas line that clumsily dropped from the ceiling, thus making the fireplaces into glorified oven burners. Yuck. You can see where it used to be right next to the fireplace where the paint is missing (of course they didn't miss painting the gas pipe). Hopefully nothing will stop me from opening the flues and making lovely raging Duraflame fires for my floozy future guests.

Honestly I'm not even sure how to take down the wall. I know you're supposed to sledgehammer away, but it would seem that the 2x4 framing would be pretty tough to break that way. I imagine I'll sledge as much plaster out as I can and take my 7 1/4" circular saw to the 2x4's. I also imagine I shall feel very manly on that day.