SEARCH
Mid-Century Malaise – "SHOW ME PICS" Version

Thursday
Nov242011

wallpaper, schmallpaper

One of the many charming details of this place is that the previous owners loved them some textured wallpaper, and you can guess how I feel about wallpaper (unless it's some kind of really cool vintage op-art madness). Adding insult to textured injury, the genuises who last painted the entire joint painted right over it, because, hey, any job worth doing is worth doing wrong, right?  God forbid you should deny the next owner the pleasure of Undoing The Stupid™.

Actually, the paint may have helped my cause because removal is matter of grabbing a corner and ripping it off the walls with your hands- it's so thick, it just comes right off, no tools necessary. That's the good news. The bad news is that it leaves behind all matter of backing/glue blechery. I was really worried that it would mess up the drywall so much that I'd have to replace it- I'll pass, thanks! But a little online research suggested simply mixing dish detergent and hot water in a bucket and saturating the residue gunk. You let it sit for a couple of minutes while the detergent breaks down the glue, and after that most of it comes off really easily. Much of it is removable by hand, and the rest I removed with a brillo sponge and a plastic paint scraper. Later on you go back with the soapy brillo sponge to get any remaining residue- it takes a little elbow grease, but it could be FAR worse. Only other thing to be aware of is that you have to turn the power off if you're anywhere near switches and outlets (I wasn't), because I'm pretty sure water and 120v AC don't mix (actually they do, therein lies the problem).

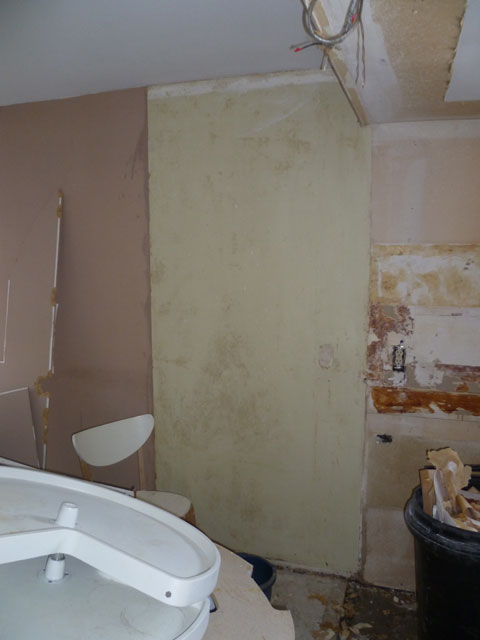
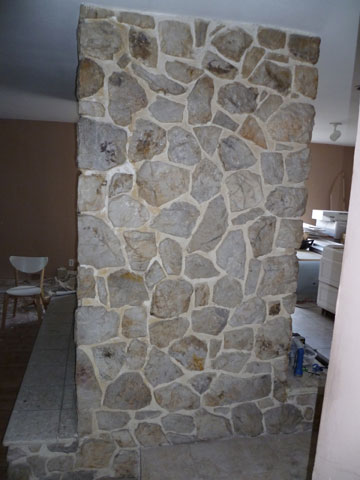
As you can see above, that lime green mess is the roughly four-foot chunk of wall I attacked, and though it looks ugly in the pic, it's actually pretty clean. I'm confident that a coat of Killz primer and it'll take paint fine. I suspect that the prior paint worked to my advantage, because you have to get the wall REALLY soapy and wet. Not sure how well the drywall would've held up had it not been painted. By the way, it is a somewhat messy process, and smells a little gluey. If you've ever done paper mache, you're in the ballpark (perhaps I could get a frame of a pig and make a pinata for all the children that don't live in my 'hood). Lucky for me, I don't care about the floor or the baseboards, because they're all going away. 

BTW, the mess immediately to the right is where I tore out ceramic tile, and that'll definitely need to be re-drywalled, because it's impossible to get the smooth set off without destroying the wall (as I pretty much did).

Monday
Nov212011

another break in the wall, pt 2.

I think the picture says it all. My good friend Maui came by the other day and checked my place out. He pointed out that getting that wall down without a sawzall was going to be a really really difficult... for those of you who don't what a sawzall is, that's a generic name for those recripocating saws with a blade that protrudes about 8". Good for cutting around corners, through 2x4's and most importantly in our case, through a bunch of nails hammered in at weird angles where we couldn't get at the heads. I was on the fence about dropping cash for a sawzall and Maui suggested I go by one of the (plentiful) pawn shops around here to again capitalize on someone else's misfortune (I saw a guy trying to a pawn an electic weed whacker at one of them). Well, third place I went, I happened upon this lovely Milwaukee sawzall, marked 50% off- $25! Six dollars worth of blades at the local Lowe's and I was in bidness.

Anyway, god bless Mr. Maui for saving my ass again, because he's a little more experienced than I at these things and was a tremendous help. The framing for the previously-there glass case (of emotion) was shockingly overbuilt, thus really hard to get apart. Lots of doubled-up 2x4's and even a 4x4 beam across the top. Thanks guys. The biggest suprise was that it appears the wall was always there. I thought the wall was an add-on, but the giveaway is that the rocks for the fireplace stop and there's a space in between:

To put it in perspective, this is the other side of the fireplace, i.e. next to the entry to the family room:

Ideally I'd want both sides to be "all rock" as it were, but that'd be difficult, so instead I'll just try and get some 5" wide trim pieces and go around the perimeter of the opening. By the way, whoever said demo work was messy was REALLY right. I didn't think it would be too bad since the wall is only six feet wide, but I was super wrong. It's a mess in there. Clean up on aisle seven...

In other really significant news. I ordered the new cabinets today from Ikea. That took some some cajones, because it pretty much means no more changes on the design. But I'm pretty confident I got it all right. Total was $1505.71+$350 to ship the whole mess from CA to here. I was afraid the shipping would be more, so I'm fine (MDF is really heavy). Should arrive in about two weeks.

$1500 is pleasantly cheap for cabinets, but keep in mind I only ordered the actual frames and drawers. All the doors, drawer fronts and exposed side panels are coming from Semihandmade Doors in CA. Think I mentioned them up here before- they're a cabinet place that makes custom doors specifically for Ikea frames. "Why didn't you just order all this crap from Ikea?", you say. Because I didn't really love any of the doors Ikea sells. I wanted very minimal, totally flush face doors with zero extra flourishes. In Ikea land, this means their Nexus model doors. For reasons I can't comprehend, they discontinued their medium brown color leaving only "brown-black"-too dark, or birch, which we all know so well from the ubiquitous Malm line of bedroom furniture. And I'll kill a motherf&*er before I bring one more piece of that damn Malm fake-birchiness into my realm. What I really wanted was medium/honey-colored mid-century-correct wood.

Fortunately I discovered Semihandmade on an Ikea forum. Their concept is to make beatiful kitchen doors by laminating really nice thin wood onto MDF doors-pretty much what Ikea does, but I don't think Ikea uses real wood. It's a little more money than Ikea, but not that much.The idea is that you get a fancy pants custom-looking kitchen for a fraction of the cost of a real custom kitchen. Right now I'm on the fence between their teak (lovely honey-tinted color) or mahogany (slightly more brown, less $$$), so I'm gonna get quotes and see. The nice thing is that I can send them the file for my 3D Ikea online kitchen designer thing and they just use that as a guide.

Thursday
Nov172011

the Manny machine

The other day I noticed my neighbor's palm trees were looking extra spiffy, as evidenced by a big, neatly tied off pile of trimmings on the sidelwalk in front of his house.

Apparently having noticed that my landscaping was looking something like one of those alien planets on Lost In Space, I asked him about it, to which he replied (redneck accent), "I was gonna mention that to you... my daughter's boyfriend is a handyman and he does it for us. He's Mexican, but he's a real good guy." (Nice! My neighbor is more of a racist than I am, because he wasn't trying to be ironic). "He's a real nice guy, I bet he'd do yours for $75 or so... I'll send him by."

So yesterday, Manny-the-Mex...landscaper, came over and did a stupendously good job of trimming my palm trees (I have about six of them, one is huge, the others are real small). Took him HOURS. I didn't have change for $75, so I gave him $80. I should've given him more. 'Til now I thought my entire landscaping situation needed to be reconfigured, but just trimming the mess made a world of difference. Between my car (which may as well be a Lamborghini in this area) and my nice new landscape, my neighbors must love me. Anyway, I took this opportunity to snap some outdoor "beauty" shots. The rose and whatever-else-those-are bushes are largely dead and I'm told you need to wait to hack off the dead parts, but that whole area smells amazing right now. I'll see what it takes to fully resuscitate them.

I think if I just swapped out the rocks in the front bed for something less sun-faded, it would look real nice. There are lights all over too, and most are on their side with wires all over. Some work, some don't, and they're ugly as sin (of course). That's another project- maybe some green and blue ones? That'd be sexy. There's also some kind of sprinkler system action in there too, which doesn't work. It never ends.


This cat is not one of mine. Don't think I don't see you! YOU ARE TRESPASSING, KITTY!

Monday
Nov142011

Four days and no new entries?!? C'mon! 

Things have been slow-ish at Casa Mitch destruction central. Here's why:

Remember that plumbing leak I talked about when I removed the dishwasher? That turned out to be a pretty epic pain in the ass. It had a standard "angle stop", i.e. one of those little oval-handled faucet-like valves. Usually you can just shut 'em off, disconnect water lines, and everyone's happy. This is how it worked with the hot and cold water lines for the sink. But once I got the water line for the dishwasher removed, it kept dripping, and no amount of tightening was gonna stop it. Off to Lowe's I went to get a cap to screw on in place of the valve. Since the there was already a threaded bolt on the pipe end, I needed two parts, a dual-threaded coupler and the actual cap.

I called my Nice Plumber Guy (guys who installed the gas lines), and he told me where the master water shutoff for the house was- under a metal cover near the sidewalk. Opening this, I apparently disturbed a large festoon of baby crickets (and some not-so-baby). Sorry guys. Fortunately I was wearing gloves. This began what would be an afternoon of running back and forth, screwing some combination of stuff on, turning water back on, then watching it continue to drip while I tightened, tried it with and without plumbing tape, etc. Then I took a trip to a dedicated plumbing store where they informed me that the threads were of crap tolerance, thus impairing their ability to impede water flow. They sold me some more cap-type stuff. Back home I went. Master water off. Same thing. Drip. Drip.

Call Nice Plumber Guys™, they tell me to get an angle stop instead (i.e. the valve that was already there). By this time, it's dark, I'm totally frustrated and I'm supposed to go see my friend Richard Cheese that night, so I shove a bowl underneath, and skulk away, defeated.

To cut a long story short, much imbibing occurred Friday night, landing me with a wicked hangover Saturday, which morphed into one of my world-famous multi-day muscular tension headaches (imagine a migraine with slightly different symptoms, but equally painful and debilitating). This lasted 'til about late Sunday afternoon when I finally got it together to return to Lowe's, and swap out their crappy cap stuff for a new angle shutoff valve (and a roll of better quality plumber's tape). Returning home, I shut off the water for the what seemed like the 100th time, tightened the new valve, turned on the master water and crossed my fingers. God bless it, it no longer leaked. Victory.

As an aside, while at Lowe's, I picked up more of my favorite new light bulb. Sylvania makes some neat CFL fluorescents that are 60-watt equivalent, but only use 13 watts, and somehow have a "light temperature" like a standard bulb. In other words, they don't give off cold, blue-ish light. They're about six bucks for two, turn on instantly, and are more compact than older CFL's. Neat-o. I don't think they work with dimmers though.

Back to today (Monday), I dicked about in Ikea kitchen designer app some more trying to decide what to do about the tops of the cabs and the part of the ceilng that drops down about a foot around the perimeter of the kitchen. Sounds simple, but it rapidly gets complicated... for starters my swell built-in cab depth fridge is to be surrounded by cabs, and the whole mess is 24" deep. This is will all go either up to the ceiling, or about 10" from the ceiling depending on how I do it.

But high cabs aren't typically that deep- they're usually 12 7/8" deep. See how this gets tricky? If I don't remove the "drop" from the ceiling, its depth isn't gonna match the cabinet depth in places. And it's gets worse because my current design has shallow cabs on the wall by the window, but all the way at the left I have another tall 24" deep cab for the built-in oven and microwave. Sigh.

Ikea basically has two wall cabinet heights- 30" and 39". It would appear the shorter ones are for situations with a ceiling drop, and the tall ones are for situations where you want to go clear up to the ceiling (or real close, with a trim piece on top). This may be what I do.

This is all getting complicated :(

Thursday
Nov102011

Almost there!


I've been slacking on posts, but the kitchen is almost totally "destructinated". Ripped out all the ceramic tile Tues, which was a total loud, tedious mess (you can see the remnants of where it was all across the walls). Fortunately, garbage was the next day, so I filled two heavy garabage cans full of ugly pale pink ceramic tile. I also completely destroyed an innocent metal paint scraper in the process with a hammer. I suspect you're supposed to use a more stout chisel-type tool, but I didn't have one handy. The drywall obviously took a beating, so much of that will get replaced.

Next thing was disconnecting plumbing and removing the garbage disposal. This was far easier than I expected, but stiiiiinky. Couldn't figure out how the disposal was attached to the bottom of the sink, then I saw some kind of slidey looking mount that apparently twisted somehow. "Gee, let me try tapping that with a big screwdriver and hammer..." KA-KLUNK! Hmmm, hope I didn't break it. Kinda wanted to recycle it in the the new sink :)

With everything detached from the sink and all caulking severed, I  realized the double sink weighed a zillion pounds (I'd guess in the 70-90 lb range) and there was no way me and my puny muscles (and currently irritated back) were getting it out. Fortunately my good friend John came by and heaved it out last night. Today I brute forced the countertops off, which is a good and violent process- you pry 'em up, then jostle them free, followed by pulling the whole mess onto the floor, and breaking it up  a bit with shiny new 4 lb sledge. Laminated countertops are super heavy too, in case you were wondering. Got those out to the side of the house where hopefully they'll... evaporate. I suspect I'm gonna have to get one of those super driveway dumpster things sooner or later, or the garbage men are probably going to Molotov cocktail my house.

Just pulled out the dishwasher, which was easy. Standard 110v plug into the wall, turn off water supply from wall and unscrew, then pull out the drain hose... and splatter water from the hose all over the room and side of your head. Crap! I guess that's a relatively benign casualty given the scope of this mess. Rest of the cabs should be pretty easy to remove. I'm getting pretty good at it!