SEARCH
Mid-Century Malaise – "SHOW ME PICS" Version

Sunday
Dec042011

let the soffits hit the floor! 

I have to admit, I've been anxiously awaiting the opportunity to use that headline. Slowly been making my way around knocking these down, because the wall cabinets will go clear up to the ceiling. I made the decision to eliminate the soffits because the built-in refrigerator and cabs on either side stick out 24" from the wall, and they'll both go almost all the way to the ceiling, whereas the soffits and high-mounted wall cabs stick out about 15", which would have left me with some things sticking out further than others. Thus I eliminated the issue by deciding to remove the soffits.

Anyway, the first section of the soffits I took out the other day was obviously not part of the original build because it had modern metal framing and intact ceiling above. Relatively easy to remove, but you have to very careful with the metal framing, because it's sharp edges galore. Happy to report that I escaped unscathed.

Just did the part shown above. It's wood-framed and unfortunately, open to the interior of the house, and the insulation is punctured and spitting noxious pink stuff all over the place (I have a breather mask, but it's currently floating all over my house). Anyway, I managed to weaken the whole thing by strategically knocking out the little 1x4's that hold the whole thing up, thus creating the "KABOOM" mess above, in the grand Vegas tradition of choreographed demolition. The secret is to make sure you're not under it when it's about to drop, but you knew that. And to remember to pull out the nearby fluorescent tubes because I don't care to make glass part of the cleanup equation.

BTW, my entire Ikea cabinet order arrived yesterday, and it's in about 527 boxes and bags in my garage right now. Wee!

Saturday
Dec032011

some things they don't tell you about renovation

Instead of my usual, "hey check out my awesome progress knockin' down walls/ripping out entire kitchen/imploding the MGM Grand Hotel" post, today I'm gonna share some of the more mundane day-to-day realities of the process.

Yucky remodeling fact #1) It's Gonna Make A Big F&*ing Mess

That may not look too bad, but here's the thing; I currently have four 36-gallon garbage cans (I actually lost one in the Gilligan's Island-magnitude typhoon the other day, but replaced it today) and I spend a LOT of time with the 7 1/4" circular saw hacking down pieces of wood (or breaking pieces of drywall) and stuffing those damn cans. Downsizing the rubble pile is akin to glimpsing a distant oasis that always appears to lie just over the horizon, but alas, is never found. The good news is that garbage pickup (somewhat inexplicably) occurs twice a week. But I imagine the garbage men probably hate my guts by now, especially considering that a large amount of my refuse tends to be of the smashed-up-wood-with-a-billion-nails-sticking-out variety, thus inadvertently creating garbage cans full of weapons. Sorry guys. Maybe I'll buy them a case of beer. Kidding aside, I kind of have to get it together and clear it out pretty soon, because Mr. Tear Out The Floor Guy ain't gonna be real happy if he shows up to do his business and can't see the floor he's here to remove.

Yucky remodeling fact #2) Bathrooms Make Lousy Kitchens

Like most people who don't reside in tents and refrigerator boxes, my living situations have always included the convenience of a kitchen. I'm certainly not the type who enjoys "roughing it"– I've never camped in my life. (this being because I am, technically speaking, a Jewish person, and Jews don't camp. Don't bother trying to debate me on this.) Given my currently non-existent actual kitchen, I hacked together a reasonable facsimile thereof in one of the bedrooms:


Mid-sized refrigerator- Already owned this from my old studio, and has the unique "feature" of a separate area at the top for ice trays, ostensibly colder than the rest of the interior. The reality is that if you adjust the temperature cold enough to freeze ice cubes, it freezes everything else. Ever try to slice a frozen onion? Weird things happen. Additionally, you really carefully must consider grocery purchases due to severe space constraints. This is especially ironic in light of the fact that the World's Largest Sub-Zero refrigerator lies dormant on its back in my garage (to answer the obvious question "why don't you use it" 1) it's extremely difficult to stand a 500 lb refrigerator up, and 2) having a the fridge that far away from the room would totally suck, almost as much as having the sink in the bathroom, but I'll get to that...)

$15 hot plate bought from Amazon- because no brick-and-mortar store actually carries them. The good news is that it works suprisingly well. It'll actually boil water.

Microwave, toaster oven and coffee maker- no calamities there, but I try not to turn too many things on at once for fear of blowing a breaker.

Now, about that sink business: you don't realize how much you rely on a nearby sink while cooking until it isn't nearby. Running to the bathroom every time you get egg on your hand is a total pain in the ass. But where things really went awry was that I foolishly did dishes in the sink, and quickly plugged the drain with icky food remains. For a couple of weeks I've been working around the nasty reality of a sink that fills up with water in the manner of bucket. After the first week, I had the semi-bright idea to use a garden-variety kitchen strainer in an attempt to preemptively catch food gunk, but it was already too late. I assumed the drain was clogged at the trap (that being the curvy and frequently stinky part of the pipe under the sink), so armed with a tools, gloves and a bucket, I disassembled it this morning. As it turned out, the trap was (relatively speaking) clean, and the food-detritus-mess was actually right at the pop-up drain plug, mostly in the plastic "wings" directly beneath. I had to undo the open/close mechanism under the sink to get it out, but once removed I was treated to this disgusting culinary greatest hits collection of the past month:

Yeah, that might just be the problem. Fortunately, my gross out threshold is pretty high– as long as it doesn't involve poop or live scary insects, I'm pretty tolerant. Anyway, I took this mess outside and rinsed it clean, then didn't re-install it. In its place, I dropped in not one, but two metal strainers from the local Lowe's. Two of 'em weren't my intention, but they only sold them in packs of three sizes, and the two smaller ones were super close in size, so I figured why not drop them both in for extra protection. Now I can do dishes again without concern about water-filled sinks. Smells better there too.

In unrelated news, I am currently listening to the just-purchased Pretenders II album, which is awesome ("Day After Day"). Chrissie really ruled before half her band tragically perished and she transformed into an abrasive PETA/vegan soapbox monster. 

Friday
Dec022011

garage rock

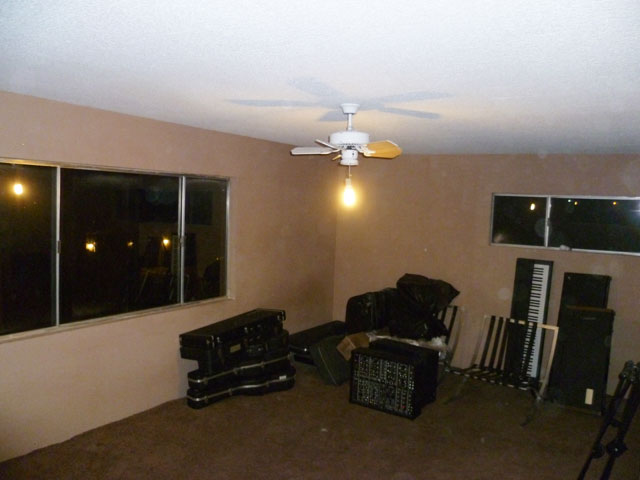
I've been so occupied with the kitchen/living room mess that I haven't really paid much attention to my studio situation. For those of you who don't know me well, I had a real nice deal on a space in LA for my old studio; a four-office unit of which I occupied two of the rooms. The main room was about 23'x13' and contained my main desk (i.e. computer+two displays/mixing board/speakers), a big rack of gear, my ever-expanding mess of synthesizers, guitars, etc. One of the primary reasons for choosing my house was its over-the-garage room addition- an ideal spot for my studio. Not only is it almost as big as my old place (about 20'x20', though half of it is about 10' wide where the staircase intrudes), it's physically far from the rest of the house, and I very much like the idea of a music studio being a separate entity from the house "proper". (I'm not a fan of musicians' homes with guitars, amps, cables, etc. strewn about everywhere) As an added bonus, the upstairs add-on room has a large window with a nifty view to the east of Vegas lights at night. Unfortunately, I'm facing the wrong direction to see the nearby rainbow-lit Stratosphere, but like Stephen Wright says, "You can't have everything. Where would you put it?".

Unfortunately, there were two huge issues, both potentially deal breaking. Issue one is that it has no heating or A/C whatsoever. Not so much a problem now that it's cold, but in the thick of Vegas summer, well, use your imagination. Every non-musician type who's been up there says, "no problem, just get a window A/C unit". I've had those in studios before, and putting a giant white noise and low-frequency vibration generator a couple of feet away from your head in a music creation/recording environment is sort of the aural equivalent of strapping a 10,000 watt strobe light to a painter's easel. Been there, done that, no thanks- this is one of those, I'm 40-years-old-and-I'm-not-messing-around situations. My admittedly costlier and more complicated solution is to duct over one of the combination A/C/heater units on the roof (this place has one for each half of the house), and possibly have a switchable diverter to select where the climate control is going. I'm sure it won't be cheap, but if I have to listen to a window A/C unit, I will surely leap out the window and plummet to my death, like Alex being tortured by Beethoven. The good news is that I have at least a couple of months before I need to sort this out.

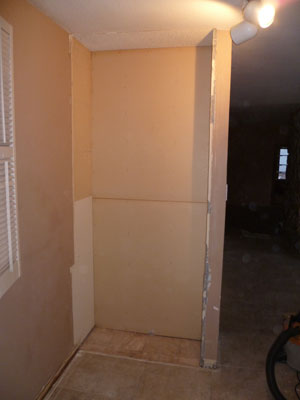
Thorny issue number two was the questionable construction quality of the addition. At a glance it all looks ok: from the outside it appears to be an original part of the house. And I have to admit I like how the added altitude makes my place appear to tower over the other nearby homes. But (cue tragic music) once upstairs in the room, the floor had a very noticeable "oscillation"; i.e. the floor bounced up and down to a disturbing degree. If my 168lb self jumped up and down it moved up and down almost two inches(!). This was not gonna cut it. Especially because the idea of going through the floor with my computer, synths, and fragile self, only to land upon my beloved BMW didn't sound too enticing. Enter handyman Keith. Handyman Keith is a very kind older gentleman I met at the local Lowe's my first week whilst standing in line. He came out a couple weeks back and determined that though they actually did a pretty good job building the addition, they made a couple of mistakes. The biggest was that they used 2x12 beams across the length of the floor with no support in the middle. Keith explained that you can really only go about 10 feet with a standard wood 2x12 before you have the construction equivalent of a flexible-flyer sled, and that anything more needs crossbeam support. And that's exactly what he did:

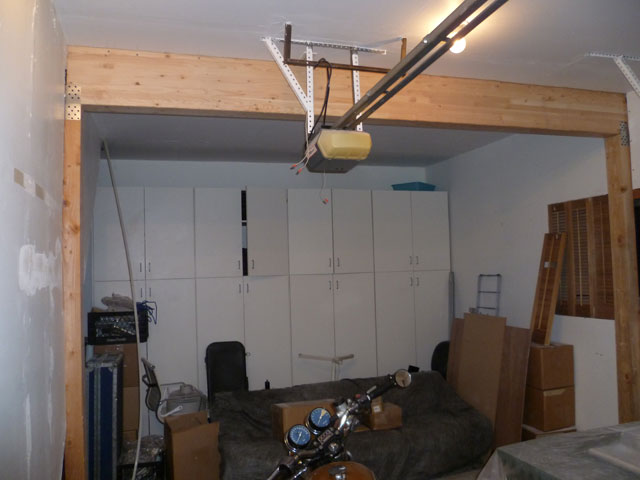
 He offered me a couple of price/performance options, and since the price differences were small, I basically took the "go nuts" approach in the form of a 5"x12" glulam beam supported by 4x6 supports, all brawnily screwed together. BTW, a "glulam" beam is basically a pile of thinner beams glued together to form a ridiculously rigid piece of wood. Seems they didn't make this kind of thing back when the addition was built. They're not cheap either- about $140, but in the grand scheme of things, not a big deal. Keith seriously wedged it up in there to the point where it actually lifted the middle of the floor about a half inch! When he finished, he instructed me to go up there and jump. The difference is night and day. Keith rules!

That said, they still blew it one other way with the original construction; they only used 1/2" plywood for the upstairs floorboards, which is a little "soft". If they didn't chintz out, they would've used 3/4". And apparently screws hadn't yet been invented, because back then 'twas all nails, and they're squeakin' and poppin' out to some degree (I'm guessing the real reason they didn't use screws more frequently in construction back then was that brawny cordless Makitas and DeWalts really hadn't been invented. Remember real screwdrivers? I would've hammered too.) Anyway, the 1/2" floor can't be removed because the upstairs walls are built on top of it, but if I really wanted to go nuts, I could put 3/4" ply on top of that. But 300 sq ft of 3/4" plywood gets expensive fast (probably $400-500), and it's really not bad now. I can feel them move and squeak a little, but Keith assures me that's mainly due to aforementioned nails. So... I'm just gonna pull up the rug, yank out the loose nails, and seriously screw the floor down.

Since I hate carpet, away it will go, to be replaced by a light-colored laminate wood floor. These are cheap and relatively easy to do provided there aren't any crazy curves or angles (there aren't). The windows are single-pane anitquity; we concluded that the most logical solution is to leave them as-is and add modern dual-pane windows, essentially mounted backwards on the insides of the sills. This way I'll have a three panes of glass and a roughly four-inch airspace in between. It'll look slightly weird, but will be easier to install than replacing the existing windows and will more effectively block out weather and sound. One place where I did luck out is that they seemed to really go the extra mile with insulation- the garage ceiling/studio floor is packed tightly with thick insulation. One could safely assume (?) that if they went to this much trouble with the floor, they must have insulated the walls and ceiling- extra important with an over-the-garage add on, since all four walls are exposed to the elements, primarly that bright 'n' hot sun thing. I'll definitely paint the room, likely white, and of course that godawful ceiling fan/light combo shall be relegated to the dumpster it belongs in. Haven't really made any decisions on lighting yet.

Sunday
Nov272011

and goodbye to grandma's cabinet

 I don't even know what you'd properly call this old-fashioned built-in, but it was adding an authentic taste of 1936 to my 1963 home, so it had to go. In addition to looking an antique, it had been sloppily painted with the artisan-quality workmanship typically found outside the local the local Home Depot (this outta offend everyone).

Unlucky for me, the build quality was the opposite- it was easily the most difficult demo job yet. Whoever built it was really hellbent on severely frustrating whoever un-built it in the future, so nice work there pal. I started by removing the doors. Of course the screws holding the hinges on were slathered in paint, so I had to use a pokey tool to get that out. Since there weren't really any exposed nails or screws, it was mostly a lot of violent smashing it apart with sister sledgehammer. Whatever finesse and studiousness I discussed in previous posts went right out the window.

The trickiest part were the boards on the bottom, sides, back and ceiling. On either side was a brawny 3/4" plywood piece running the length of the wall. The sides were not only nailed in a way where it was almost impossible to get to the heads, they were very tightly wedged between the board on ceiling and a board on the bottom (itself on a 2x4 frame). Let's just say there was a LOT of bashing at 'em with the sledge, getting tired, swearing, scratching my head, walking away to ponder it a while... finally got the side pieces out though. There was also a thin board (I initially assumed it was thicker) all the way up the back wall. Because it ran floor-to-ceiling and all the way side-to-side, there was no way to get anything in to pry it. In desperation, I routed a notch about two inches wide with my Dremel rotary tool, and was able to shove my pry bar in. At the point I figured out the board was only about a quarter-inch thick, and it was easy to yank out (albeit a little unwieldy to remove due to its size). Only messed up the dryway behind a little...

You can't see in the pic, but I did do some minor wall and edge damage getting it all apart, but I hope my drywall wiz friend Myke can compound these back to beauty. As previously mentioned, I can't think of anything else sensible to do here except more shelves* (I'm open to suggestions, FB friends). Also, since I'm in love with the wood-clad walls I see in a lot of fancy mid-century modern homes (hi Lisa), I'm thinking it might be really neat to clad the inside walls of this (and the old dry bar in the last entry) with some pretty stained or poly-coated wood, then add the shelves. This would have the additional benefit of reducing the amount of dryway-booboo-fixery to almost nothing.

By the way, the reason I'm going nuts with the demo stuff now is because the tile floor removal/polished concrete guys are landing very soon, and ALL of these areas will be getting the polished concrete treatment, provided they don't discover any deal-breaking flaws upon tile removal. The only remaining destructo stuff is removing the soffits that encircle the kitchen area (this will be a big pain in the ass job), and removing all the baseboard and quarter-round trim (a super easy job). Technically I don't need to remove the soffits before the floor gets done, but I'd rather all that crap fall from the ceiling and hit the tile floor that's getting torn out instead of marring the newly-polished floor. (Incidentally, I have just come up with most genius blog entry title pun, so now I HAVE to get crackin' on the soffit removal job)

*Actually that's not true. If I was insanely rich, I would get some really thick glass and make it a giant floor-to-ceiling tropical aquarium. How amazingly cool would that be? Unfortunately, it ain't in the budget, and besides, the only thing I know about fish (besides the fact they look neat under black light) is that I enjoy eating them in the form of spicy tuna roll with lots of wasabi. Yum.

Sunday
Nov272011

no longer looking for mr. dry-bar.


This one I actually feel a little bad about. Apparently it used to be a basic closet and was turned into a not-wet bar, though I'm not positive, because the shelves inside the cabs were really shallow and not in the shape of bottles (not to mention that the previous owner Mr. Brookman was a rabbi, and I doubt one needs a bar to house their fine collection of Mogen David and Manischewitz wine). Whatever it was, as you can see, the cabinets were a rather pretty honey wood color, and nicely custom made. I originally thought I might be able to get them out intact, but one I started getting them apart, it was clear that they were "location-built". In other words, the adjacent walls were clearly part of the structure, so it would be impossible to remove the cabinets without destroying them. I did save the doors- maybe I can cut them up somehow and use them in the future. Also saved all the hardware which was all in good shape. The shelves are all glass, and between these and the previously removed "knick knack" wall case, I'm accumulating an impressive collection of glass that I have no idea how to dispose of. I don't want to break it because, fun as that sounds, the reality of a giant pile of broken glass probably isn't safe or fun.

I had to pull out a couple of the large travertine tiles because they were wedging the 2x4 framing at the bottom. That made me glad someone else will be removing the other 600-ish sq feet in the house prior to the polished concrete job. It's not that easy, the tiles weigh a ton and the smooth set grout stuff beneath is easily a half-inch thick. I discovered a big crack in the concrete, so hopefully that won't be an issue when I get it polished. I don't really mind how it looks.

Speaking of heavy-ish stuff, whoever called me a pussy for getting "only" a four-pound sledgehammer clearly hasn't used one (or has much larger biceps than I do). The centrifugal pendulum-like effects of swingin' four pounds around are enough to wear you out pretty quickly and I found myself reaching for the standard hammer when great destructive force wasn't needed. That's another reason you don't need more- there isn't much in the way of drywall, nails and wood that stands a chance in the face of four pounds of metal at gale-force velocities. Anything more, and I'd be pretty concerned about the possibilities of "collateral damage", i.e. breaking nearby stuff you didn't intend to break.

Question now is what to do with this area. I'm debating two options; option one is to somehow make doors and/or wall and turn it into a closet. Normally this would be a great idea, but this house has so much storage that it'd actually be redundant. Besides the closet and cabinet-filled laundry/utility room about 12 feet away, there are not one, but two separate coat closets immediately on the other side of this in the foyer. More likely I'll just leave it open, get some nice 3/4" oak plywood and make bookshelves all around the perimeter. I love the idea of built-in stuff. If I do this, I'll figure out how to sand and poly clear coat them to make them look really pretty. Also will probably support them with semi-hidden wood pieces at the back, as opposed to ugly generic metal brackets.

(This is more than likely what I'll do with the other built-in monstrosity I'm about to destroy in the kitchen- you'll see this in future entries)

BTW, I also managed my second Impressive Injury™, this while breaking a wee piece of trim with a wee nail sticking out that kinda went flying. Through my shoe, at that. See the blood? Fortunately, I had Band-Aids and hydrogen peroxide at the ready, and didn't "sever any main cables".